As the years and kilometres pile on to all the SR20s in existence, we seem to be seeing more and more engine bearing failures. Having spun a bearing in a previous motor, I’m all too aware of the SR20DET’s deficiencies when it comes to oil starvation. Managing the temperature of the oil is another key consideration, especially when undergoing track work. This page and the oil cooler page deal with fitting parts to remedy these problems.
Oil Starvation -> Winged Sump
A bearing really only fails one way, and that is through oil supply (contamination or starvation). Contamination comes down to regular servicing and intelligent management of heat cycling (warming up/cooling down), but starvation can happen to even the most maintained engine. Oil Surge = Starvation.
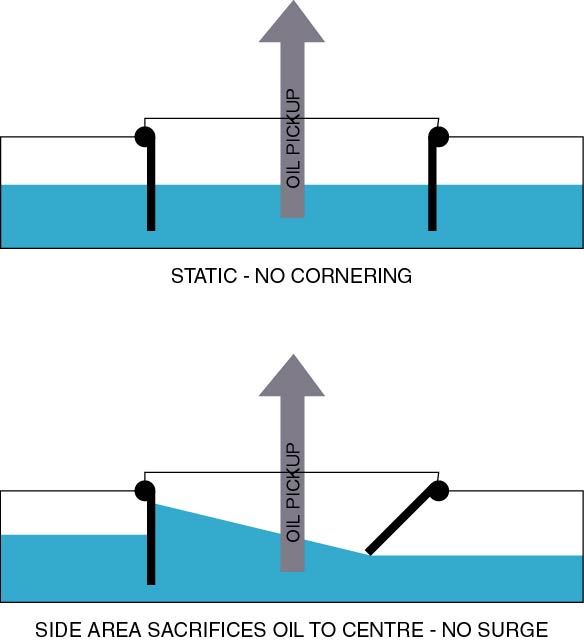
By knowing a little about oil surge we can try and prevent it from ever happening. The basic operation of the system is that after oil has been pumped at pressure through the engine, it drains back to the sump where the oil pickup is sucking oil up to the oil pump for the process to repeat again. The sump therefore is like a reservoir for the oil pickup to feed from. Most of the time this situation works perfectly well, but unfortunately the brief moments it doesn’t is enough to kill the engine. At high rpm and load just a small drop in oil pressure can cause permanent damage.
The diagram below depicts the basics of oil surge. As lateral G-forces are applied to the oil in the sump, it sloshes heavily to one side and collects against the outer sump wall. The oil pickup then may not be fully submerged and a drop in oil pressure may occur. Street conditions will generally not provide enough force to cause oil surge, but track conditions easily can. It is recommended then that the problem definitely be addressed if track work is on the cards, and is recommended anyway for a more reliable street car.

Factory Sumps
The factory SR20 sump is just a simple pressed pan with a single orifice for draining the oil. If a low car bottoms out, there is a good chance of denting the surface. Needless to say a much greater chance of starvation is then present, and a damaged sump should be swapped for a nice condition sump immediately. Most factory sumps will be similar in design, and therefore be susceptible to surge on the track. It is recommended then that an aftermarket sump be fitted to address the problem.
Aftermarket Sumps
Most aftermarket sumps differ from the original design by way of adding large winged sections on either side. These sections are usually baffled to separate the sump into three distinct areas. During cornering the inner (relative to the corner) side section sacrifices its oil volume to the centre section where the oil pickup is located.
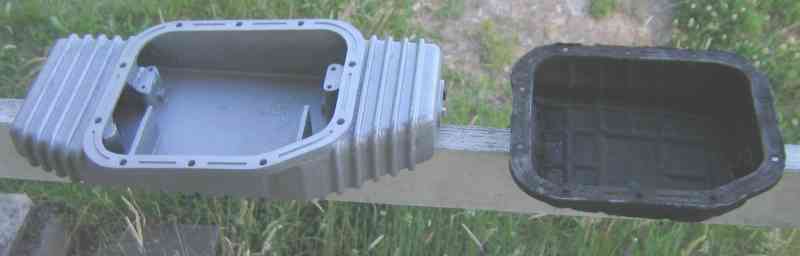
The sump I have chosen is a TRUST/Greddy copy bought from Midnightmods.com.au. Below it is seen along side the previous factory sump.
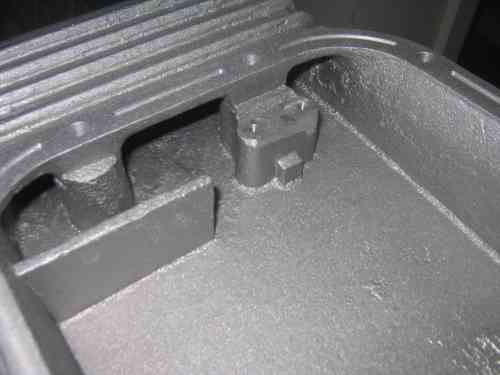
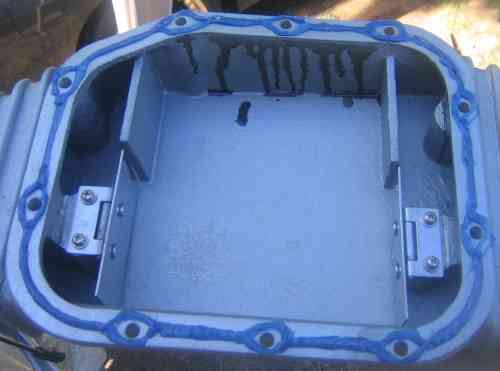
The internal baffle assembly is seen below, with the Greddy design having bolt on trapdoors that control oil movement throughout the sump. They are arranged so that the doors can only open towards the centre of the sump where the oil pickup lies. Small gaps exist around the edges of the trapdoors, which is to allow slower movement of oil to keep the capacity of all three sections level when not loaded up with G-force.
 |
 |
 |
The easiest way to explain the behaviour is with diagrams. Below a comparison graphic is provided to show the oil level of the sump at rest. The level of oil in the three sections is the same because the small gaps between them allow slow flow to equalise the fluid height. When cornering however, things become different. The lower diagram depicts this situation.
The capacity of the outer wing stays much the same since very little oil transfer is allowed and the trapdoors only open inwards, but the inner wing has donated most of its oil volume to the centre section by way of the now own trapdoor. So now the centre sections oil volume is increased when it needs it most. If the forces were suddenly to be reversed then the trapdoor that was previously closed would open and send its oil into the centre section, leaving an even greater volume of oil in this area. Therefore quick side to side cornering will only increase the available oil to the pickup. After a short amount of time oil transfer between the three sections will stabilise thanks to the small passages available even when the trapdoors are closed.
Other Advantages
Besides combating oil surge, a winged aftermarket sump has cooling benefits. First and foremost the greater the volume of oil present, the further the thermal load is spread. It is safe to say that if all other things are keep the same, that the introduction of extra volume will lower oil temperature some what by dispersing the heat over a greater amount of liquid mass. Further to this, the ridges found on the sump are mainly for structural purposes, but will act as slight heat sinks to cooler the sump and its contents. Don’t think that this will solve serious over heating issues though, a winged sump is no substitute for an oil cooler. For slightly easing the temperature though, it is a bonus.
Dry Sump System
The most effective way of combating surge is to have a dry sump setup. Usually reserved for very developed track cars, the normal sump area simply contains a few scavenger pumps which draw oil draining downwards towards a remote reservoir where a new oil pickup is housed. The system can have its new sump where ever it is convenient, with which ever shape and volume suits. The dry sump could therefore have a huge volume to totally eliminate surge. The new oil reservoir is often tall and skinny with the oil pump at the bottom, eliminating surge.
This type of setup is elaborate and therefore more expensive than an aftermarket winged sump, and thus is usually not considered on the street. However if you think this is for you, then please research further.
Installation of Winged Sump
*Warning* This job is really no harder than a lot of the other things on this site, but it is one of the most important to get right. The oil lubrication system is the heart of the motor, and any foreign particles getting into could necessitate an expensive rebuild. Please ensure that the new components are exceptionally clean and clear of debris, as well as any other objects that will come in contact with a oil supporting area of the engine during the job.
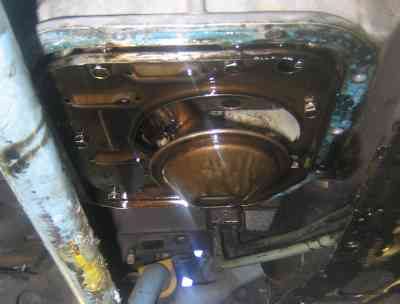
The first step is to drain the old oil from the system into an appropriate container, so that the factory sump can be unbolted from the bottom of the engine with a minimum of mess. It will be hard to avoid some mess however, so be prepared. Unscrew the series of bolts around the perimeter of the factory sump and pull it off. A bead of silicone might be between the engine and sump so if sticking occurs a gentle tap with a rubber mallet should release the bond.
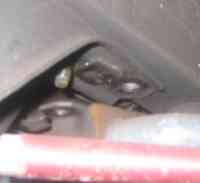
Now you will see the the oil pickup and some baffling with the sump removed.
Next, clean off any remaining silicone around the flange on the bottom of the engine, a clean area is a must to ensure the new silicone sealant does its job well. One last check of the inside of the new sump for debris is a good idea, as well a similar clean of its mounting flange. The next step is to apply silicone to the sump flange is a thin and neat pattern. Run the bead on the inner side of the bolt holes as shown below, but not too close to the inner edge of the flange. If any silicone overhangs the flange too much, it runs the risk of breaking free, joining the oil and blocking oil galleries through the engine.
Once the silicone is in place, start to insert the bolts back into the assembly. Take car to keep the sump in the correct position, any sideways movement could roll the silicone bead off target. Without completely torquing the bolts up, visually inspect the join around the new sump. Check that no chunks of silicone have gone wayward. If so, it might be wise to pull off the sump, clean off the silicone and start again. If all is well tighten the bolts completely.
I sourced a new magnetic sump plug to go with the new sump plug. It catches any metal particles floating in the oil supply to prevent them going back through the engine. Seems a safe and cheap way for little extra security. Now is the time to ensure this is tight. Be warned though the new alloy sump will be a softer metal than the sump plug, and over tightening could damage the thread of the sump. Depending on what sump you get, it may may a different thread to the standard sump plug, forcing you to use the sump plug that come with it.
A second hole will often be found on aftermarket sumps for the introduction of a temperature sensor for an oil temp gauge. Either place the sensor in firmly if you have one or ensure the hole is blocked with a grub screw or similar if not.
Now you are ready to change the oil filter (recommended) and then fill up the engine with oil. Obviously the greater volume of oil will require more to be inserted each change. An approximate new figure with oil filter change is said to be 5 litres for the SR20DET, but its always better to creep up on this to avoid overfilling. Put in a few 100ml less than this to start, and wait some time for the oil to drain through the engine to the sump. Check the dipstick and add oil as appropriate.
Problems #1 – Grey 180sx
The only real problem I encountered was the sway bar being in the way. I decided after some fiddling that the best way to do the job would be to undo the mid mounts for the sway bar so it has some range of movement. Please note however a smaller factory sway bar may not have these issues, but for only four fasteners it is worth making the job easier.
When the larger sump was finally in place, the sway bar didn’t want to fit back on. Luckily, I found a solution in adapting the control arm mounts to angle the middle of the sway bar away from the sump. If still just touches and I can feel the extra vibration in the car but it’s something to get used to. This mucking around ate up of a lot of my time, and I was lucky in the end to have gotten everything back together.
A very big warning: It may end up that some people will not be able to get the sway bar and the sump on at the same time, so be prepared to have major dramas.
I don’t know if this same problem would exist with a genuine Greddy sump either, maybe it is just a side effect of the Whiteline sway bar.
Problems #2 – White Sileighty
This modification was repeated over a decade later with my white Sileighty. It has an aftermarket sway bar which clears the new sump without issue. There was a huge issue in the casting of the sump, however. It fouled badly on the oil baffle which sticks down a few mm past the oil pan flange:

I didn’t realise this until everything was siliconed up and I had two bolts in. At that stage I saw that the sump was rocking from side to side. I had to pull it off, wait for the gasket goo to dry, scrape it off the bottom of the engine and scrape it off the sump. Then the fun began: grinding. After a few hours of the finger belt sander and angle grinder I finally had enough clearance. The surface adjacent to the flange was convex and needed to be ground concave (shown below). There’s probably about 5 mm or so to be ground which is quite significant.

After a thorough clean and reassembly of the trap doors with loctite, I siliconed up the sump a second time and assembled without any further issues.
Conclusion
Quite a simple process really (if you use the genuine Greddy item perhaps). The health of your engine should be greatly increased, especially if track work is on the cards. Hopefully now you can exploit the full ability of your vehicle with newfound confidence.
