As the years and kilometres pile on to all the SR20s in existence, we seem to be seeing more and more engine bearing failures. Having spun a bearing in a previous motor, I’m all too aware of the SR20DET’s deficiencies when it comes to oil starvation. Managing the temperature of the oil is another key consideration, especially when undergoing track work. This page and the winged sump page deal with fitting parts to remedy these problems.
Oil Temperature -> Oil Cooler
The coolant from your engine is pumped out of the engine to the radiator, where air moving over the core cools the liquid before it returns to the engine. A thermostat resides in the pathway to the radiator to prevent coolant circulating outside of the engine while the engine is not up to temperature. By default, the engine oil has no such cooling, but can be added with an oil cooler.Not all models will have the thermostat, however. These are recommended to prevent the situation where the dash board indicates the engine is warm (via coolant temp) but the oil is still not up to temperature.
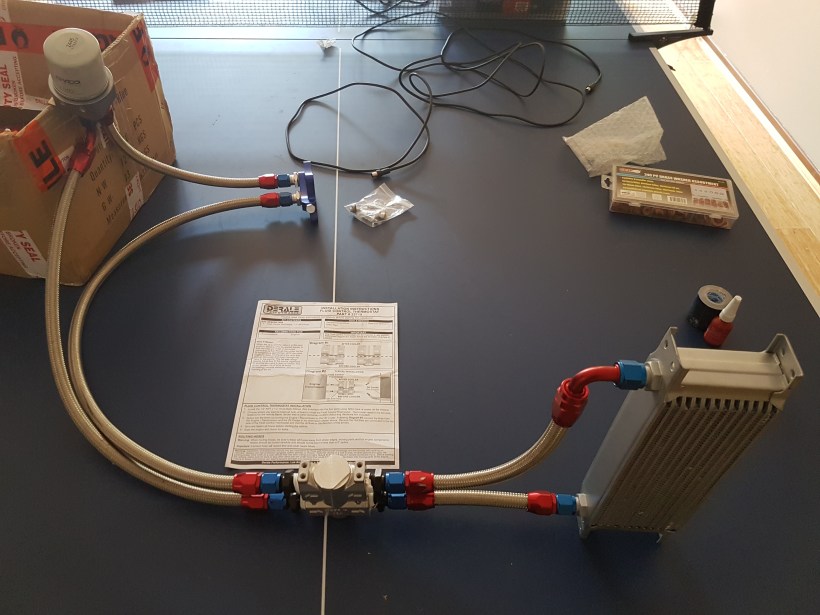
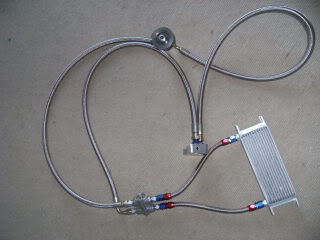
I purchased my unit as a kit from Midnightmods.com.au. It comes with a core, braided hose, AN fittings, a relocation block, remote oil filter mount and thermostat. Instructions are scarce, but the image below shows roughly how the system is plumbed.

The relocation block bolts to the block in place of the factory oil filter mount, with two orifices for sensor and two AN fittings.
One hose leads to the remote oil filter mount, where the oil travels through the filter and then onto the thermostat. When the oil is cold, the thermostat will send it back to the block. When the oil is hot, the thermostat will send it through the oil cooler core and then back to the block.
The braided hose comes in a single piece (approximately 3 metres), meaning that it needs to be cut and the AN fittings assembled for installation. The upside is the ability to place the components where you want, the downside is more work.
Cutting Hose and Assembling AN Fittings
Cutting stainless steel braided hose is something I’ve never done before so some research was required. Some people used hacksaws, metal cut off wheels on a grinder or Dremel to sever the hose. I was very concerned about debris going down the hose and being introduced to the engine. Instead, I decided to purchase a cheap set of cable cutters and a set of soft jaws. Unfortunately, the cable cutters were not up to the job so I returned to my original plan of using a Dremel with cutting discs. The friction and the heat of the disc also made a mess of the hose. The final plan was to use a mini hacksaw or hacksaw which ended up being quick and neat.
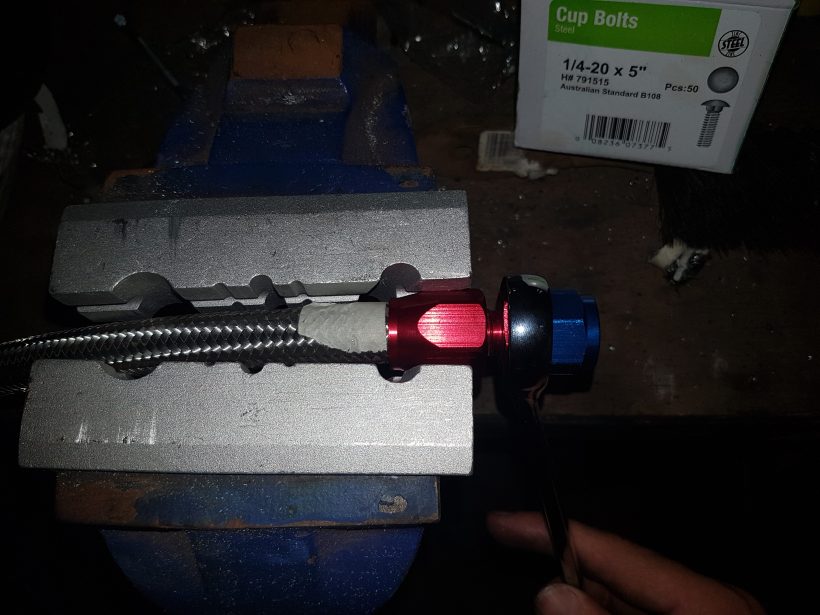
Layers of tape are applied around the cutting site to prevent fraying of the braid. I mounted the hose vertically and used the top surface of the soft jaws as a guide for cutting flush.


Check for debris inside the hose and remove it if need be. Any stray bit of stainless steel braid can be removed with a set of scissors or shears. The tape should now be removed and the hose twisted into the outer half of the fitting. The soft jaws are handy once again here. The assembly is then clamped and a 22 mm spanner used to insert the inner half of the fitting. A piece of tape can be seen which was used to indicate if the hose had pushed back out of the fitting. I actually found it easier to clamp the red fitting facing up, different to the image below. The two 90 degree fittings are larger in size and I needed vice grips with layers of rag for protection in between to tighten them.
These parts are aluminium so don’t over do the torque and strip the thread. Thread sealant will go a long way towards piece of mind.
Routing the System
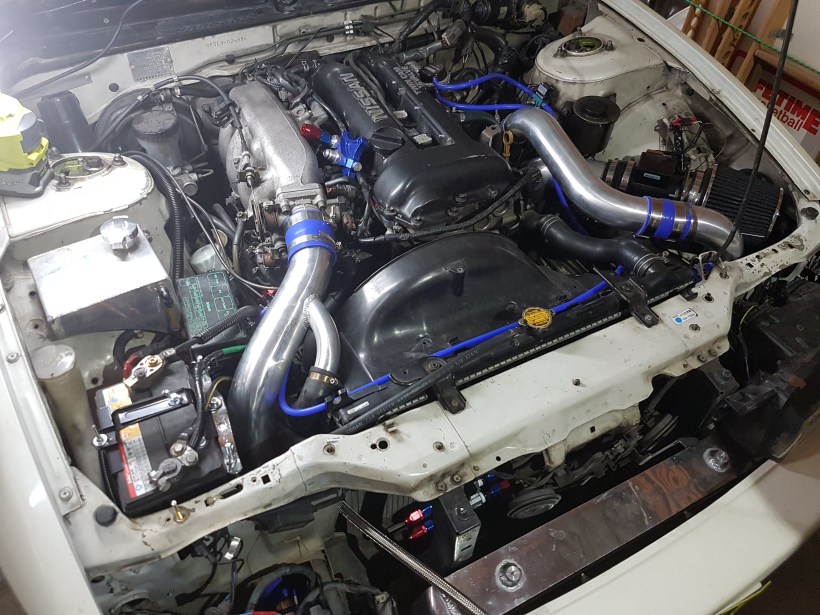
This part will vary depending on where you intend to mount the oil cooler, thermostat and remote oil filter bracket. I chose to have the oil cooler up on its side in between the intercooler and radiator on the right hand side. The thermostat would sit in front of the radiator and the oil filter mount on the driver side strut tower next to the fuel filter.
There is a handy opening underneath the battery tray and to the left of the radiator when looking front on for the hoses to travel between the engine bay and radiator area.
Removing the front grill and driver side headlight gives the just enough required space to squeeze the oil cooler and thermostat down into the cavity. I recommend covering the battery, as at one stage I managed to short the positive terminal to ground when a piece of stainless hose brushed over the top.
You can now go about mocking, marking, cutting and assembling the hoses one at a time. When I was done, I removed the lot and reassembled it indoors to more show my routing more informatively. The dark blue section bolts to the block in place of the factory oil filter mount, with the new remote oil filter mount placed on the driver side strut tower, the two lines go underneath the battery tray to in front of the radiator where the thermostat and core reside.
Please take care to have the hose to and from the oil filter correctly placed, as oil filters have a one way valve inside. Getting it backwards would starve the engine of oil.
The filters are designed for oil to enter from the outside and return through the centre hole. This means that from the plate that bolts to the block, the outer hole should then connect to the outer hole of the remote oil filter mount, then the inner hole connect to the thermostat. The lines should eventually feed back into the centre hole of the plate that bolts to the block. The thermostat also comes with a diagram on how it should be connected. Check and double check these. Each of the fittings needs proper tightening with loctite in the thermostat, mounting block and oil filter plate.
Note: As you will read, access for the plate that bolts to the engine block is limited. It might be a better strategy to not assemble the fittings on this piece until it is on the car.
Preparing Sensors
I planned to fit an oil pressure and temperature sensors in this install. Rather than have to disassemble the system later, it’s better to have the components in place ready for wiring.
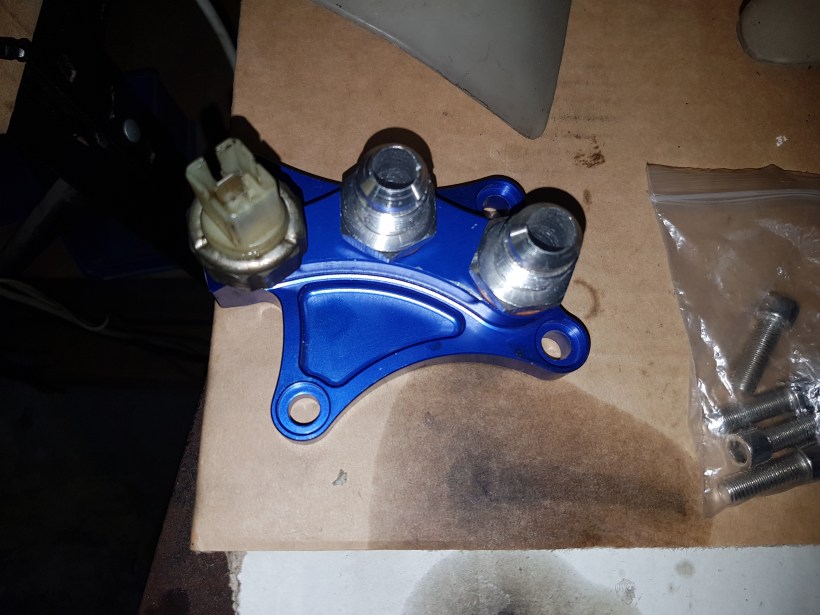
There are two tapered 1/8″ NPT orifices on the oil filter mount and the component that bolts to the block. After dummy fitting the oil filter mount, I decide there would be enough room to keep the sensors on that piece. The grub screws on the other pieces need to be sealed and torqued. NPT is a tapered thread so it will become tight even though some thread is still visible. Don’t over tighten and strip the thread. Thread sealant is a must.
My temperature sensors were simple probes that needed fixing to something with a thread. I used the blanking bolt that came with kit and drilled a hole through the centre a smidgen larger than the probe. As shown below , screwing the bolt in and sliding the sensor in place had very little of the sensor in place before it fouled the internals of the oil filter mount (left). I taped the other openings closed and hot glued over the top (middle) to form a barrier from the debris to come and then used a Dremel tool to grind some clearance. After a clean up, the final probe fitment can be seen (right) with the oil pressure sensor also in place. The strongest epoxy I could buy was then used to secure the probe in place so that it had about 1 mm clearance from the filter mount internals.


Mounting Brackets
Each part of the kit has sections to insert bolts for mounting, but only the oil filter mount has an actual bracket for bolting to the chassis. This means some light fabrication is required. I purchased a piece of aluminium strap from the hardware store to make up any brackets I needed. I also purchased some 1/4″ nuts and bolts to go into the thermostat. Many of the parts are made in USA so have imperial threads.
The first thing I did was position the remote filter mount. My strut tower is busier than most because of the brake master cylinder stopper. To free up more room, I unscrewed the main bolt and halved its length. This allowed enough space for the mount with ample space to take off the oil filter. Bending the bracket as shown below to move the mount off the strut tower also freed up more space. There are a series of plugged holes in the strut tower. I used one of them and then drilled a second hole. With the driver wheel removed for temporary access, nuts and bolts hold it nicely in place.


The next part was mounting the actual core, which I figured was crucial as I wanted to ensure it had a good position for airflow. The thermostat can sit where ever it ends up in the ample cavity in front of the radiator, and therefore can be mounted last. The rough positions are shown below:
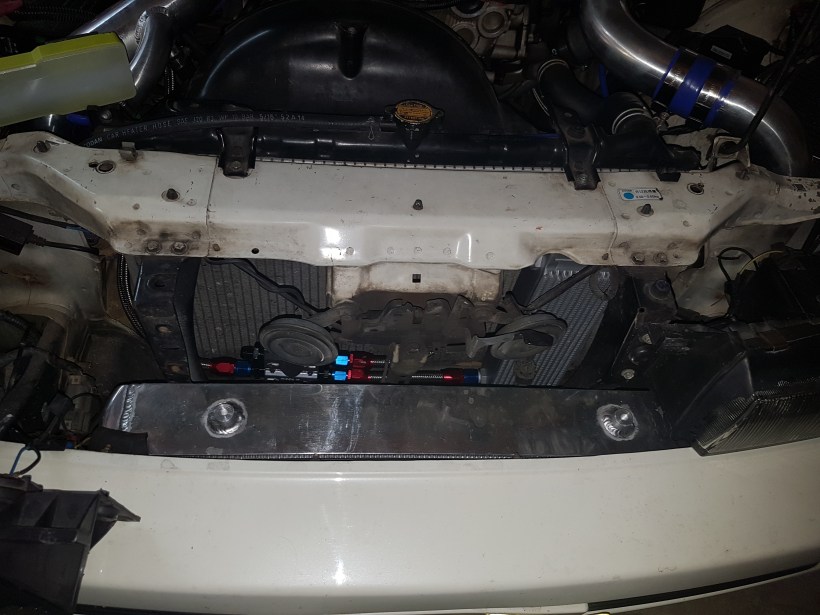
Where ever possible I tried to use existing holes to prevent drilling into the chassis. The top of the oil cooler core was mounted to such a hole with a straight piece of aluminium (left). At the base I used a small right angle metal bracket lying around and riveted it to part of the sub-frame (middle). The thermostat was fairly rigidly in place from the tension of the hoses, so I used a single bracket made from aluminium to prevent any movement and vibration (right). Some short nuts, bolts, washers and spring washers were used to ensure everything stays in place. This job might have been much easier if I removed the front bar and intercooler, but instead I struggled to fit tools and my hands down small crevices. Unbolting the headlights, grill and the loosening the horn mounting tabs all helped.


Final Installation
All that remains is jacking up the car and unbolting the factory oil filter block and putting the aftermarket one in its place. Of course before this is done, the engine needs to run for a while to warm up the oil, so it can be drained. Removing the throttle side intercooler pipe is a must and the alternator needs to come out of the way too for any type of decent access. I found this quite a tricky job. Access to the plug and terminals at the rear was troublesome, and the whole thing was pretty grubby and stuck in place. There is just enough room to squeeze the unit down past the radiator hose and fan shroud to remove it. There are some brackets under the inlet manifold that should come out too. This was harder for me because I already had the remote oil filter mount installed which blocked access from the direction of the strut tower.
With all of this gone the real job can begin, which is removing the four bolts holding in the factory oil filter block with an allen key. It’s really hard to get good access, there is not enough room to get much rotation on the key each time. An alternate tool to an allen key (in hindsight) is a screwdriver hex head bit, held by a small socket and attached to a ratchet. The area is depicted below (in between the engine mount and radiator hose):

The removed piece can be seen below next to the new one:
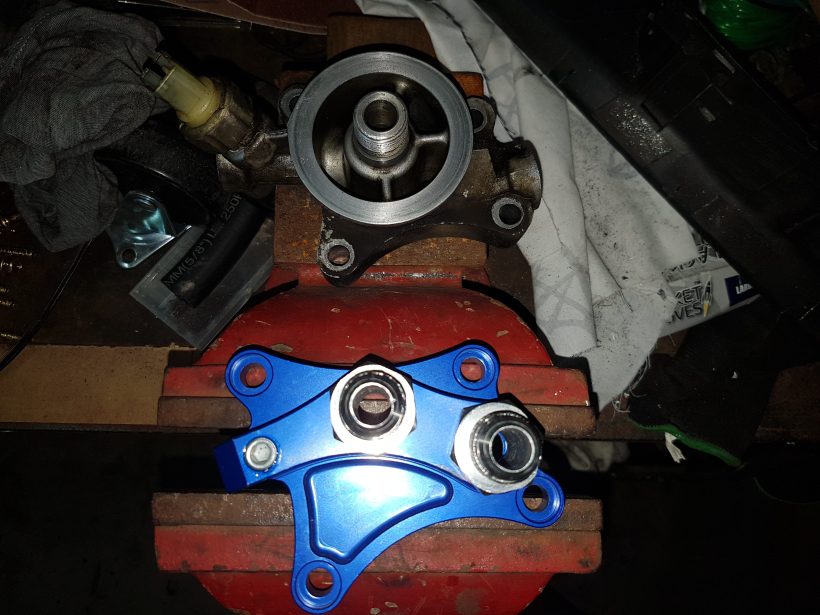
Remember that the oil is routed from the outside in through the filter, so the left fitting needs to be the return line back from the cooler. There is a factory oil pressure sensor too, which I removed and inserted into the new block. Lucky I ended up mounting both of my new sensors elsewhere, or there would be some head scratching at this point. The new plate ready to go:
The kit comes with new sealing washers for the back of the plate, so don’t forget to place them before you use the new hex head bolts to secure the plate to the block. Once again access is tricky. The sensor and fitting hinder the movement of the allen key. A different strategy might be to assemble the fittings last when the plate is already on the car, but I imagine this would difficult too. Removing the entire inlet manifold would be a huge job but make access straightforward. Draining the coolant and removing the driver side coolant hose would make accessing the alternator bolts easier but it can be done without this.
There should just be enough room to tighten all of the braided line connections with a 22 mm spanner. I discovered I owned a second, stubbier spanner which came with my CNC router. This came in handy in the tight spaces. The line from the block to the oil filter mount was slightly too long and made lining up the fitting difficult. I persevered for a while, but when it was clear I was in danger of damaging the thread in one part, I made the decision to remove the hose, remove a fitting, shorten the hose by 30 mm and reassemble the lot. It went back together much nicer after this. The final path for the hoses can be seen below:

Reassembly and Testing
It is important to try and fill the new system with oil before first start of the car. Air pockets in oil systems make broken bearings and expensive rebuilds.
Ideally, you would leave the return hose unbolted from the plate on the block, unplug the crank angle sensor to prevent the car from starting and crank until oil filled the new hoses and came out the return line. This approach would need the alternator left off so plan accordingly.
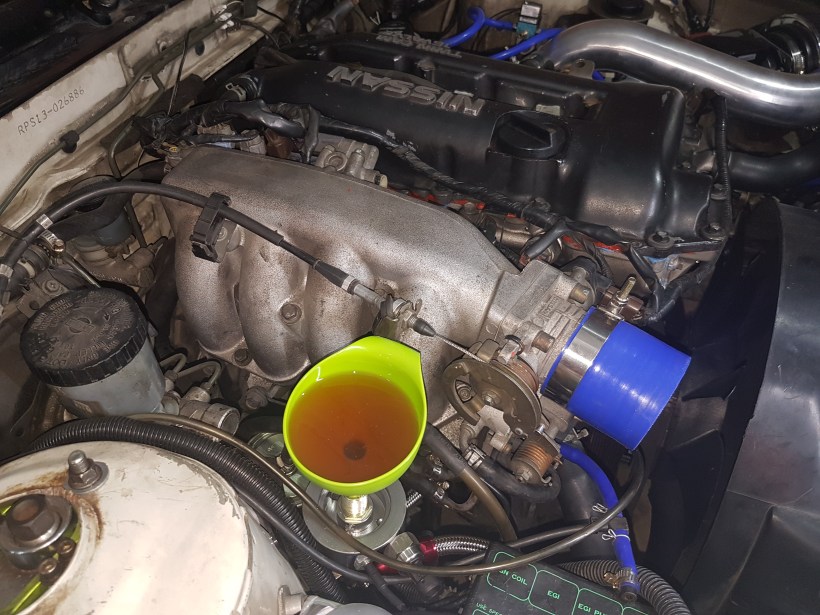
It might also be a plan to try and pre-fill much of the new system with oil to aid this process. The easy access oil filter mount with a funnel provides a nice way to do this now. It would be hard to fill up the entire system but two and a bit funnels worth will help.
The alternator and associated brackets are elaborate, I was confused for some time on how the brackets went back on. Between the FSM and this pic I managed to get there.
Whichever way you complete the install, it is essential to crank the engine for some time without it starting to push oil through the system. Unplugging the CAS will kill the spark, and the fuel pump relay can be unplugged to stop fuel. I charged up my jump starter battery to full, connected it and cranked the engine for a good thirty seconds. This should ensure the new oil cooler is primed and ready to go. The car started up and ran perfectly, with no leaks! I let it idle for a while and then turned it off for the oil to drain, checked the dipstick and then topped up as required.
Since I had competed a lot of work recently that could introduce debris and foreign particles into the oil supply, I thought it wise to buy the cheapest oil and filter I could and run it in the engine for a few days. Engine oil flush and then some proper oil with a new filter should hopefully remove any nasties that escaped my careful cleaning.
