To kick off stage 2 of the engine mods I have ordered a stainless steel equal length runner exhaust manifold. I purchased this with new gaskets and studs from the forums at NissanSilvia.com for $550. The aim is that it spools the turbo earlier and gives a little extra top end flow. With the standard turbo I’d expect it might hit a tad over 160 rwkw but the real reason I want it is to optimise the fitment of the aftermarket turbo. The manifold is straight bolt up and places the turbo in the original low mount position, so therefore the dump pipe, etc does not need to be changed.
 |
 |
 |
 |
Once the manifold arrived I was able to get a better look at its quality, which seems very good. The internal welds are ground to ensure smooth gas travel and it came with a small brace that attaches near the two flanges, therefore eliminating any chances of the manifold drooping or deforming once hot. This is seen connected below.

Fitment
Before starting the procedure it is important to note that some items are required, in the form of new coolant, a new head to manifold gasket and a new manifold to turbo gasket. The process for changing the manifold is the same as when you replace the commonly failing turbo to manifold gasket (which had conveniently just gone on the 180). It is also highly advisable to have new studs and nuts for the turbo to manifold junction.
Let me thank friends Craig and Daniel for their help throughout the day. In particular Craig who kept on striving when I had walked off muttering profanity over difficult tasks. Thanks so much guys, no way I could have done it without you!
Disassembly
Perhaps a handy hint is to remove the bonnet from the car for this job, as it frees up a lot of room and allows a lot of light. The first step is to remove all of the induction plumbing, including the intercooler outlet pipe and the piping from the afm to the turbo inlet. Next undo the dump/front pipe to catalytic converter bolts, which is much easier than undoing the dump off the back of the turbo. Next start undoing the manifold to head nuts, which are all 14mm hex heads. These should be accessible from the top of the engine bay by using a combination of spanners and sockets.
Now drain the coolant from the system to avoid it going everywhere when you undo the coolant lines from the turbo. This is the next step, and involves the oil and coolant feeds and drains. The entire assembly should be free to be carefully lifted out of the engine bay.
 |
 |
The Old Gasket
There are four nuts which either be 12mm or 13mm depending on whether your car has been fiddled with in the past. Mine had been and had a combination of sizes. One the nuts stripped the thread on the old stud too, luckily I had new ones for the new manifold. As can be seen my gasket was in a sorry state, it was in two pieces and missing about a quarter of it. No wonder I couldn’t reach full boost in any gear. Here you remove the old gasket and place on the new gasket, and do up the turbo to the manifold very tightly.

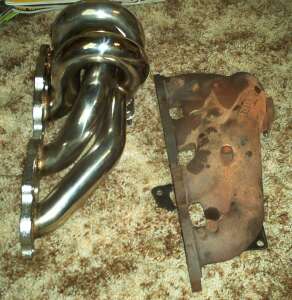
Comparing New to Old Manifolds
Seen below are comparisons between the factory cast manifold and the new aftermarket stainless steel and equal length runner manifold. The new manifold is much larger due to the twisting runners aiming to achieve equal length, but the flanges should be the in the same position.As can be seen on the picture above the exit path into the turbo appears quite restrictive, where as the new manifold has suberbly ground collectors for optimum gas flow.
 |
 |
The Factory Turbo
Here is the factory Garret T25G in all its glory. The condition of mine appears very good with no oil leaks and very minimal shaft play. Got to be happy with that.
 |
 |
Reassembly
This is by far the hardest part. In theory it should be quite straightforward, but certain parts are fiddly and can take a lot of time to achieve very little. First make sure you remove the old head to manifold gasket and put on the new one, which is very easy to forget. Now slide on the new assembly into place and tighten the manifold to head nuts a little. Next is the oil and water lines, which can be extremely difficult to get back on. Taking care to ensure the little copper washers are not lost, you must insert the banjo bolts into the head dead straight or the thread will not engage.
We lost a copper washer and had to scour a local wrecker for a replacement, which was found in another copper washer that had to be modified to fit. Hindsight saw us cover the area underneath the lines with white foam, so that if they were dropped they could be found again. After about three hours we finally had the bolts back, a huge wrap to Craig for his perseverance here. Now just bolt back on all the plumbing and put in the new coolant. Before starting the engine disconnect the crank angle sensor and turn it over a few times to get some oil flowing through the turbo again. Hopefully nothing leaks and all is well. Also don’t forget to reconnect the exhaust underneath the car.
Problems
Like others I have spoken to my manifold fouled on a boss on the cam cover that part of the factory oil catch can mounts on. Pictured below this had to be ground down with an angle grinder to provide clearance. Once the manifold is in place the actual catch can itself has no where to go now. I removed this and ran a modified similar piece of tubing directly from the vent in the cam cover to the pipe into the block. Apart from this everything else fitted well.

Driving Impressions
With everything ready to go I took the car for a spirited run. The first thing I noticed was all my low down torque was restored and then some. With half throttle at low revs the car was still building boost nicely which assists tractability immensely. The car seems to pull harder up top too, now much happier revving out to around 7000 rpm where before the power levelled off at around 6000rpm. The biggest difference however is in the power delivery. The car now feels seriously smooth in acceleration, I expect a very stable dyno graph. It makes the car feel refined but still fast, which I love. Overall I would recommend the mod as a driveability mod instead of a move for all out power, I definitely think it was worth $550.
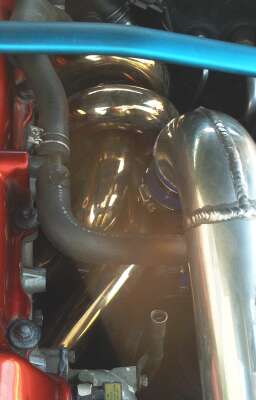
One cool side effect was the colour change after the first drive in the car. With not too much boosting the heat made was still enough to turn the manifold gold, as below in a before and after shot. Hopefully after a very hard run at the track it might get a few blue spots as well.
 |
 |
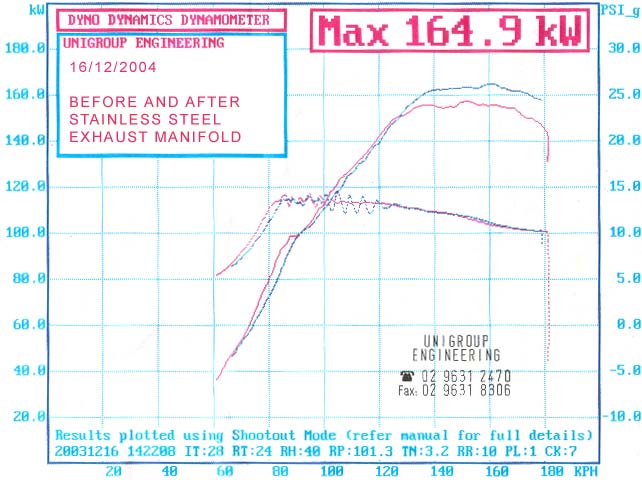
Dyno Testing
I was very surprised at how solid the power gain was from the manifold. It has made much more of a difference than the addition of a dump pipe did so perhaps it should become a more common mod. Interestingly enough the obvious gains were made right up top, which accounts for my impression that the car was revving out better.
I enquired as to why the lower part of the graph was lower, and Yavuz explained that that section had a lot to do with the load he placed on the car to get the turbo spooling before progressing the dyno run. I am not concerned at the graph, as on road performance suggests that the turbo is more responsive than ever before, which is beautiful to drive. Also, the ebc was spiking a little around the earlier rev range, which it tends to do once the long vacuum hose of the dyno is teed in.
Notice how the boost falls away in the top part of the rev range to around 11 psi. This is because the factory turbo is out of flow. Raising this boost level to about 15psi gave no gain at all, so I will keep the boost at 14psi. Apart from a little more from freeing up the intake system with a larger air flow meter, the only way to now make power is to work around the flow the turbo can provide, by altering the volumetrics of the engine. This involves making the most of what the turbo can provide, by changing the camshafts, porting the head and tuning the fuel and ignition.
The gain is a solid 7.5 rwkw, which i am very happy with. I’m sure after seeing this there will be more S13 owners considering this mod as a valid one to gain real power. Thanks to Yavuz an Chris from Unigroup for their running the car for me and giving advice.