This page is a general introduction to the development of the chassis and suspension of my car. It contains really simple explanations of what various available suspension parts are and what they will do. Some sections may have a brief description of some installation tips.
Coilover Spring/Strut Assembly
Factory S13 suspension by technicality is coilover strut, but when people refer to aftermarket coilovers they mean buying units where the whole lot comes assembled together and matched in spring rate/damping. Japanese coilover kits are usually rock hard compared to factory suspension, and deliver a bone jarring ride on anything less than a perfectly smooth road. On such a smooth road however, the handling difference is immense, with response, turn in and cornering speed greatly improved. There are other ways to get a car handling great, so remember that even though coilovers are very popular that other avenues should be explored.
My coilovers came on the green 180 and I’ve stuck with them since. They are Kei Office/Ergfolkei units, as seen on the Kei Office D1 car and various other promo cars. Kei Office is owned by Keiichi Tsuchiya, D1 judge, revered as the grandfather of drift. The spring rates are believed to be 9 kg/mm front and 7 kg/mm rear, which is definitely of the stiffer variety. Damping is adjustable to 4 presets as well as height adjust without upsetting spring preload (top end feature).

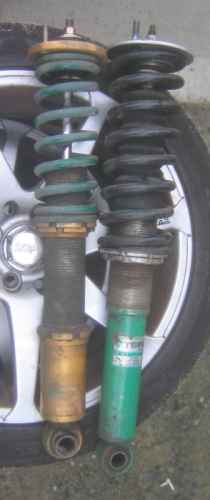
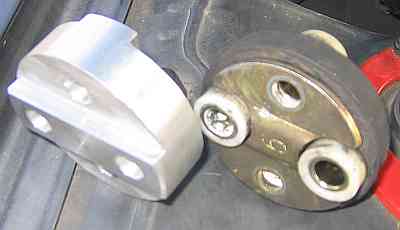
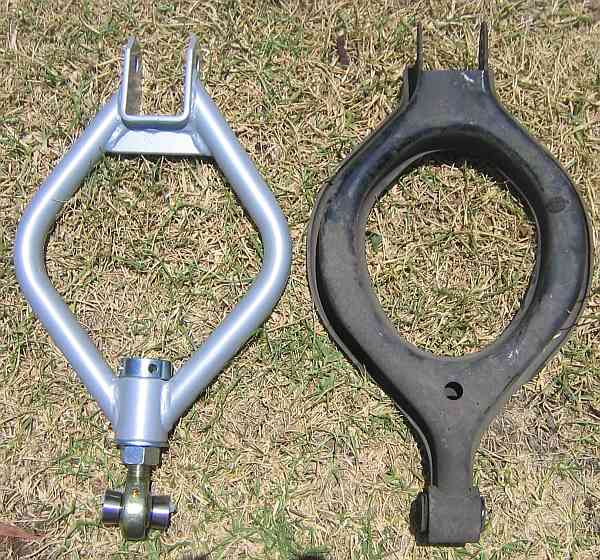
The image below right compares a more expensive coilover (Kei Office, left), versus a cheaper item (Tein, right). Remember Tein make more expensive coilovers too, so don’t think I’m saying that all Kei Office coilovers are better. The first thing to notice is how much more robust the base of the Kei Office coilover is, with a larger diameter. Secondly and more importantly is the locking ring at the base of the strut, allowing ride height to be changed independent of spring compression. On the Tein unit the spring must be compressed to shorten height, and hence a limiting factor in raising the car will then be keeping the spring captive. The Kei Office coilover has none of these problems. The Kei Office item also has damping adjustment which the Tein does not. These are all things to look out for when buying coilovers.
Installation is simple. Simply unbolt the nuts at the strut tops (three front, 2 rear) and then the nuts at the bottoms (two at front, one large at rear). Coilovers can go in and out in about 5 mins per corner once the car is jacked up.
The concept of spring rates is easy to understand. With a spring rate of 5 kg/mm, the spring will compress 1 mm for every kilogram of load placed on it. If a car weighs 1200 kg and has 50/50 weight distribution from front to back, each corner should be supporting 400 kg. If placing the car back on the ground after being jacked up, the suspension will compress 80mm under the weight of the car. 10 kg/mm springs would be twice as stiff, with the car only compressing 40mm.
This principle works while the car is driving. If a large bump is encountered, the load on the spring will increase. A lower spring rate will be more compliant and provide a softer ride for passengers, where as a higher spring rate will feel a lot harsher in the cabin. As a very rough guide, the car will handle better the higher the spring rate, right up until the point the suspension is so stiff that it doesn’t cope with bumps and traction is lost as the car skips across the road over undulations. On a circuit, the road is smoother and therefore track cars can have stiffer springs. On the street, however, conditions are variable and inherently worse, meaning a compromise in spring rate must be sought.
Damping is the other concept to understand in suspension. Imagine a bouncy ball, dropped from a height. It will hit the ground and return to almost the same height, losing a little energy and height with each bounce, eventually stopping. Without dampers, car suspension would behave like this. Hitting a bump would have the car bouncing up and down repeatedly as the energy was slowly absorbed into the springs. Driving a car with badly worn shocks/dampers is quite like this and very dangerous. A damper aims to control the springs by stopping them from bouncing. A higher damping rate will stop the bounce more quickly. Damping gets very complicated when the suspension has the capability to independently tune both bump (spring is compressed) and rebound (spring is uncompressed) damping.
Further reading can be found here:
Click to access A-Guide-To-Your-Dampers-Chapter-from-FSAE-Book-by-Jim-Kasprzak.pdf
Front Camber Tops
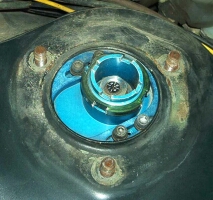
The front camber tops are believed to be Project Mu and feature additional ride height adjustment from the engine bay. Very handy indeed. Camber tops allow the top of the strut to be slid inwards or outwards, giving an instant camber change. At the rear of the car, this system does not exist and other parts must be installed to change rear camber.
There is lots to be found on camber by searching the internet, no need for a big explanation here. Negative camber will compromise straight line grip but will come into play as the car leans over during hard cornering. I am currently running around 2.5 degrees of negative camber at the front, but will probably reduce this a little to increase straight line braking grip with more contact patch available. The following animation gives a quick visual reference:
Castor Rods/Tension Rods/Radius Rods
Known by many different names but with only one purpose. I am unsure of the brand of my castor rods but they are setup to run approximately 6.5 degrees of castor. The item in question allows complete adjustment of the front castor alignment setting.
Castor is a measure of how much the axis of suspension travels leans back from vertical. Motorcycles have very obvious positive castor in the front, because the entire fork assembly leans away from the front of the bike. The more castor the better is the popular opinion, because it allows sharper turn in and faster return of the steering wheel to the straight position after letting go. The following animation illustrates castor (in an exaggerated way). Please note that negative castor would be very rare/non existent.
Sway Bars
The switch to aftermarket Whiteline adjustable swaybars for me was sensational. Previously it felt as if the outer front turning wheel was being overloaded, running out of traction and thus limiting the cornering capabilities of the car.
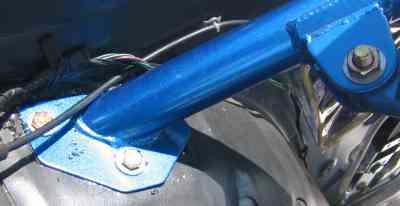
I haven’t physically had to fit swaybars myself but the details of the job are easy to see. The front sway bars mount to be the control arm on both sides and have a secondary mount on the chassis. Simply unbolt these and change.
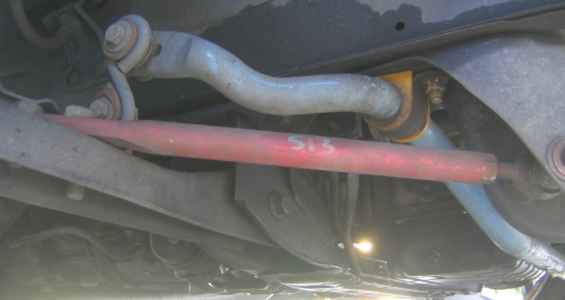
| Front sway bar mount: | Front sway bar path: |
 |
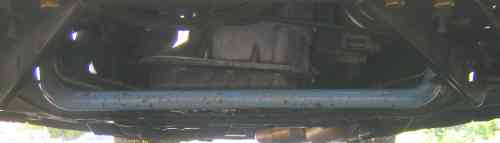 |
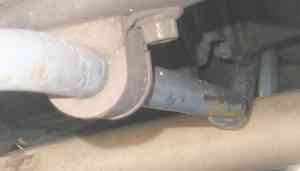
The rear is a bit trickier, as the swaybar curves over the top of the exhaust. It is recommended then that the cat-back section of the exhaust be removed prior to installation. Similar mounts are found on the lower rear control arms with body mounts once again on each side.
| Rear sway bar mount: | Rear sway bar path: |
 |
 |
Sway bars are probably one of the biggest areas of improvement available in suspension tuning. Unfortunately it is something a lot of people forget about. Sway bars keep the car a lot flatter, spreading the cornering load more evenly and making the chassis feel a lot more stable. Body roll is when the body of the car leans heavily to one side during cornering. Body roll is reduced and overall the car feels a lot more chuckable. Excessive body roll can be seen in the following animation:

http://jalopnik.com/tag/tata-nano
Strut Braces
Strut braces are very commonly fitted because they are cheap, simple and super easy to install. Simply park the car on level ground, undo the nuts on top of the struts, put the brace over the strut studs and replace nuts. Rear strut braces can be harder simply due to interior trim in the way, so take a lead from me and strip it all out anyway.
Strut braces are meant to increase rigidity of the car much like a roll cage. It is said that during heavy cornering the body of the car will flex and suspension geometry will change. A strut brace will go a long way to fixing this; in theory at least.
Front strut brace:

Rear strut brace:

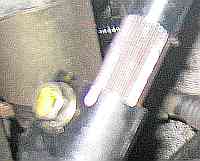
Alloy Steering Spacer
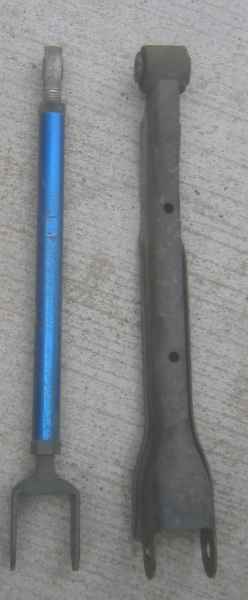
This part is very simple. It replaces a rubber link found in between the steering wheel and steering rack with a solid alloy one. A small amount of play is removed giving a more solid steering feel and increased feedback. These spacers are quite cheap and worthwhile for the money. However fitment should be simple but isn’t, with only four nuts to be fiddled with. The best way to get at them is to move the move the fuel filter to the side and unbolt the bracket which holds it. You will definitely need two people from here on, as attempting to undo the nuts only turns the steering wheel. So position a 12mm spanner against a solid part of the engine bay and have your helper turn the wheel in the correct direction to crack the nut.
The only other thing to do is to loosen the nut that secures the lower rod into the steering rack (upper right pic). This will allow the rod to slide up and down, thus giving ample clearance to remove the old rubber spacer and put in the new alloy one. Doing up the nuts should be much easier now as the new spacer won’t flex and move like the old. Don’t forget to tighten the lower nut near the rack and to put the fuel filter back in place.
 |
 |
 |
 |
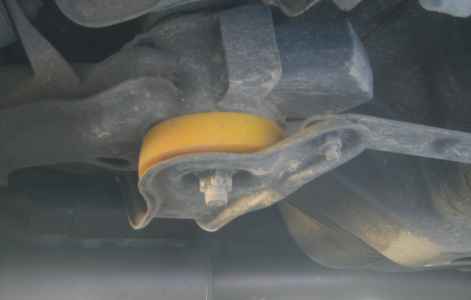
Urethane subframe mounts (Pineapples)
These are a very cheap addition to the chassis, and many have delved because of this. Although I have them I know little about them, so this section will be limited. Pineapples are usually used to combat axle tramp, the sudden and severe vibration of the rear subframe in wheelspin conditions. I have heard mixed reports of whether or not they actually work, but my car very rarely suffers from axle tramp so make of that what you will.
 |
 |
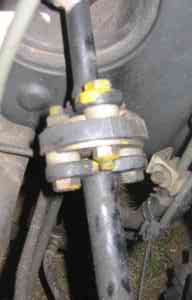
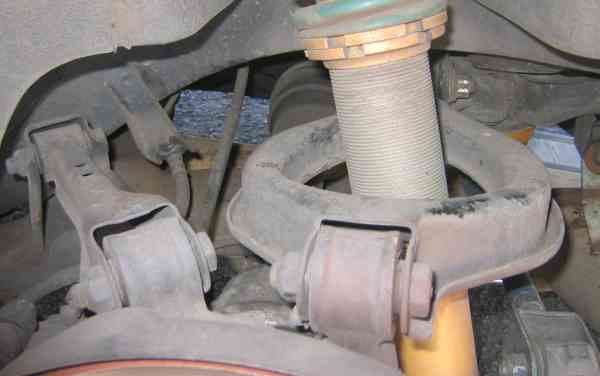
Rear Upper Camber Arms
As the S13 chassis is lowered negative camber is introduced. This reduces contact patch and thus available traction, giving the Silvia/180sx platform the infamous tail out behaviour suited to basic drift. Sometimes you actually want traction, and sometimes you really need it. My rear camber was found at 3.5 degrees negative, and then was adjusted with the factory allowance to 3.0 degrees. Ideally it should be somewhere near 0.5 degrees negative, and closer to neutral if drag racing is on the cards.
Rear camber arms are needed to correct this, and depending on how much adjustment is required, the other upper control arm may need replacement too. The rear strut will have to come out to fit the arms, so remove this first. The closest bolt is straight forward but may be very tight. The rear bolt has factory adjustment built in so is much trickier. One side loosens the nuts for the whole bolt, while the turning the other simply rotates the assembly to push the mount either closer or further from the chassis. What needs to be done is to for the first nut to be completely removed, and then the strange shaped washer behind it removed too. Now carefully tap the large bolt out. Leaving the washer on could catch it on the thread and damage both so be careful. Now simply reverse the process to fit the new arms.
A wheel alignment will be required to set everything up. Also note with these adjustable parts that you should double check that the adjustable sections are secured tightly before driving. They should only be tampered with during an alignment. Thanks to Harry for his time in fitting these parts with me.
 |
 |
 |
Rear Toe Arms
Very simple, these arms allow toes adjustment at the rear end of the car. Two bolts has the old ones out and new in. A wheel alignment is recommended after fitment to make sure everything is correct. Be careful with the factory adjustment bolt as described in the section immediately above. I am currently running 0.5 degrees of toe in on the rear.
Toe is the amount the front or rear wheels angle in or out. Toe in means the wheels are pigeon toed. Toe out is the opposite. The following animation illustrates this simply:
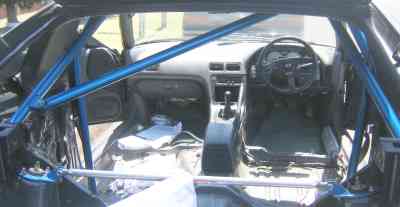
Half Roll Cage
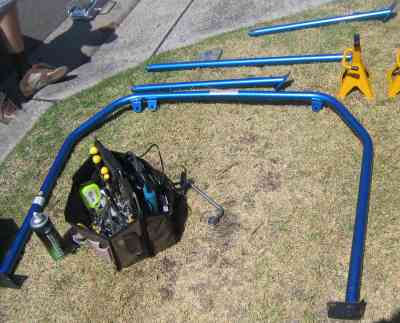
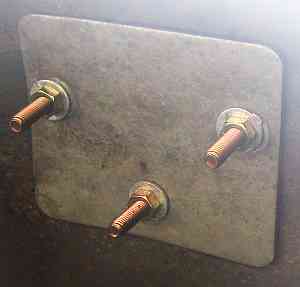
Besides the obvious benefits of safety in a roll over a full or even half cage acts like one giant strut brace, increasing rigidity of the car. This cage comes from Cusco and is made of chrome-moly. It is designed to be bolted in fairly easily, (weld in cages are as far as I know illegal on street cars in Australia) and can be removed just as easily if need be. A dummy fit first takes place, which needs removal of the seats to make room. Once the main piece is in position, drill through the floor of the car and fix the underside plates tightly. They will flex to follow the shape of the floorpan with enough force. High tensile nuts and bolts are extremely necessary. Once the four mounts are secure (each side behind the seats and each side on the rear inner guards), the bolts must be shortened to prevent fouling on the road or tyres. Lucky last is to tighten the linking joins between the pieces. Thanks to Harry once again for his time in guiding the fitment of this cage.
 |
 |
 |
 |
