* Please note: This page is a combination of two different brake swaps. The grey 180sx had standard rears with Z32 fronts, and the white Sileighty has R33 fronts, HFM larger disc upgrade and braided lines. The information will be merged to be as informative as possible.*
The front brakes on S13s are a little underdone, even for the SR20DET equipped cars which have the largest discs of the S13 range. While the S13 cars have only single piston front calipers, most others in the Nissan family have much larger four piston front calipers on thicker discs. With the ease in which the turbo variants can gain power, the factory brakes quickly become the weak link in the overall performance. Luckily it is quite a simple proposition to upgrade to better items from various Nissan cars.
Nissan Car Front Brake Comparison
Below is a table featuring the most commonly considered models and their front brakes. Thanks to James for supplying most of the data in this table.
|
Car |
Number of Pistons in Caliper |
Caliper Material |
Disc Diameter (mm) |
Discs Thickness (mm) |
Other |
Stud Pattern (PCD) |
|
S13 CA18DE(T) / SR20DE |
1 |
Iron |
250 |
18 |
4 x 114.3 |
|
|
S13 SR20DET |
1 |
Iron |
280 |
22 |
4 x 114.3 |
|
|
S14/S15 SR20DET |
4 |
Iron |
280 |
30 |
5 x 114.3 |
|
|
R32 GTS-T Type M |
4 |
Alloy |
280 |
30 |
5 x 114.3 |
|
|
Z32 300ZX |
4 |
Alloy |
280 |
30 |
5 x 114.3 |
|
|
R33 GTS25T |
4 |
Alloy |
296 |
30 |
5 x 114.3 |
|
|
R32 GTR |
4 |
Alloy |
296 |
32 |
Cross drilled discs with larger calipers than others |
5 x 114.3 |
|
R32 GTR VspecII / R33/R34 GTR |
4 |
Alloy (Brembo) |
324 |
30 |
Brembo calipers |
5 x 114.3 |
4 Stud or 5 Stud
As can be seen on the above table, the main problem with converting an S13 to the better brakes of another model is that the S13 has a 4 stud pattern whereas everything else has a 5 stud pattern. Therefore it must be decided whether to retain the 4 stud pattern or convert to 5 stud.
Converting to 5 stud requires the changing to the hubs from the model the brakes are coming from. The bolt on of other suspension components from that model are also required, usually the knuckles. This makes the process a little complex but has the advantage of being more thorough. No discs have to be redrilled and a wider range of wheels are available in the 5 stud pattern.
Retaining 4 stud is the simplest way to upgrade the brakes, as it is just a case of redrilling the rotors from the new set to 4 stud and they should almost bolt on. The only other work required is to shorten the banjo bolt of the S13 3-4mm and trim or remove the backing plate. Alternatively, new discs can be purchased from someone like DBA that are blank, allowing a fresh 4 stud pattern to be drilled.
Caliper Clearance
Another trouble often found is that most of the wheels available in 4 stud are the incorrect offset to clear the bulkier calipers, requiring spacers to be fitted. 5 stud wheels have a habit of having a good amount of room behind the spokes for the 4-spot calipers, another advantage to making this conversion. Sometimes where the brakes are very close to clearing but just foul, the embossed Nissan lettering on their outer surface can be machined off to save a few millimetres.
Detailed Comparison
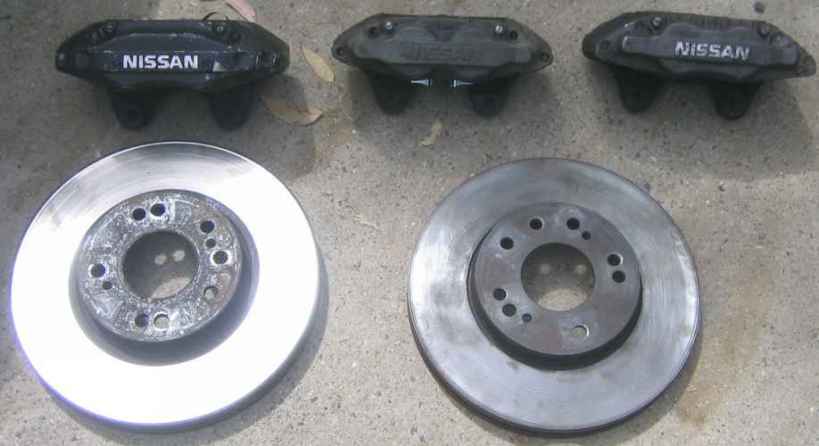
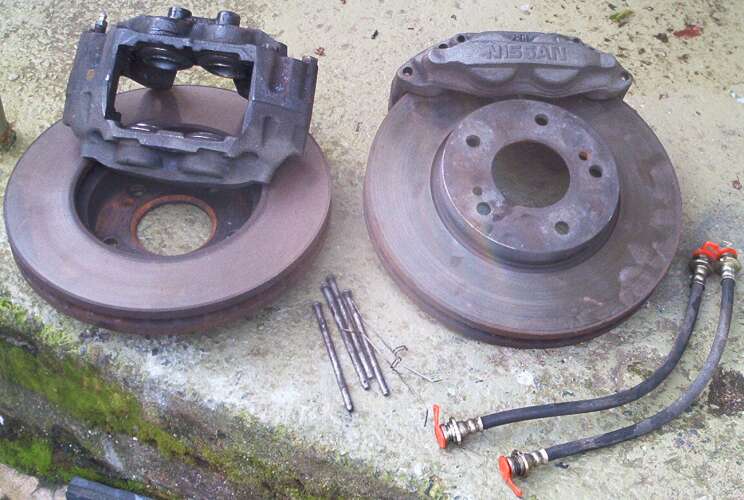
Below is an image of three sets of brakes. From left to right are the R33, S14 and Z32 calipers. On the bottom left is the larger R33 disc and on the lower right the identical size S14/Z32 disc. All the the calipers take the same brake pad, although you cannot mix and match the discs and calipers. That is to say that the smaller S14 or Z32 calipers will not fit the larger R33 disc.
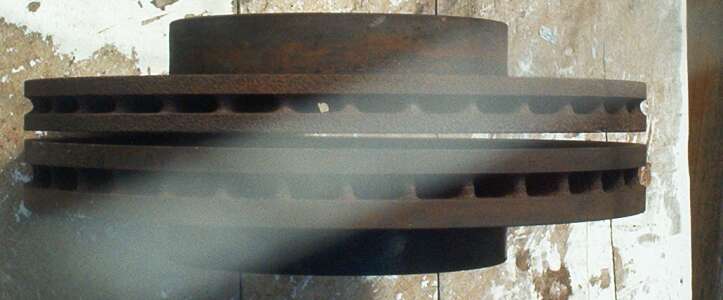
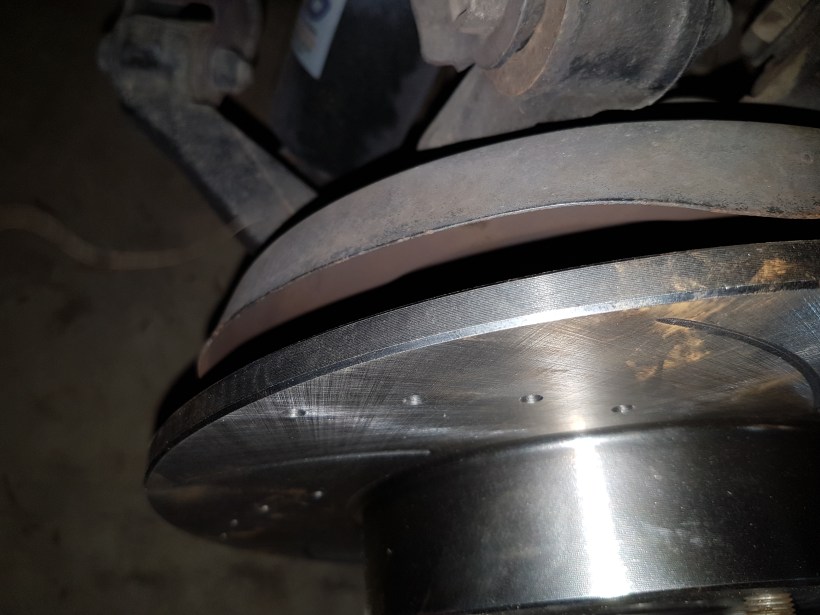
Shown below is an original disc compared to an S14 disc. It can be seen that the discs are the same diameter but the S14 discs are noticeably thicker. This adds a bit of weight from the increased material, but should be excellent for avoiding heat sink induced brake fade.
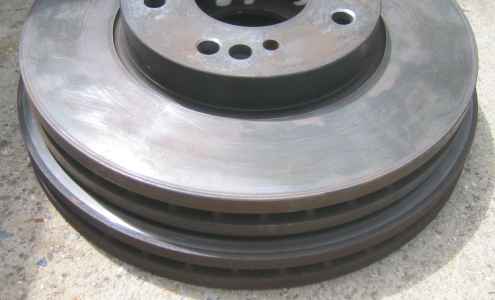
Here the size difference between the Z32/S14 discs and the larger R33 disc can be seen. They are laid directly on top of one another, as to display the larger diameter but identical thickness.
S13 SR20DET and S14/ S15/ R33 Front Caliper Comparison
The S13 brakes use a two part caliper as they are only a single piston caliper. Therefore, the two halves must be engineered so that they squeeze equally on both sides despite the piston only being on one side. Here is the single large piston from the S13 caliper versus the four pistons on the S14 item. The advantages here are a greater and more even spread of braking force across the pad and the rotor. Also note the open ends of the S14 calipers allowing greater air circulation around the pads and pistons and also greater ease in changing the pads.


I weighed the each caliper, with the results shown in this table. It is obvious that the S14 calipers are quite heavy. It might not seem like much more but when the mass concerned is attached to the suspension it makes a big difference to handling. The R33 calipers are superb in their light weight despite being the largest of the three. Definitely the one to go for, although you will pay extra for it.
| Model | S13 | S14 | Z32 | R33 |
| Weight (per caliper) | 4.8 kg | 3.6 kg | 3.8 kg | |
| Material | Iron | Iron | Alloy | Alloy |
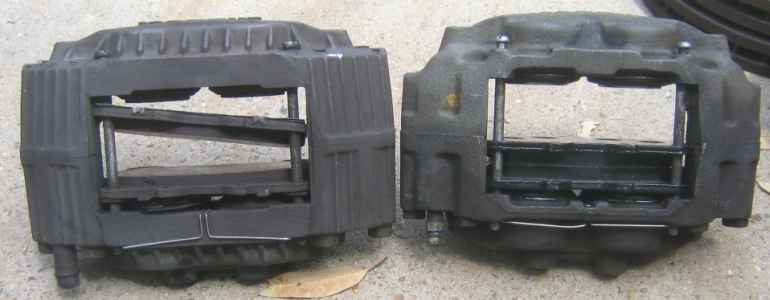
In this shot it can be seen that although the Z32 (left) and S14 (right) calipers have slightly different castings, they are basically the same design.
My Choice on the Grey 180sx: Z32 Brakes
I was originally after a set of R33 calipers to go over new DBA blanks drilled to 4 stud but when these late model S14 brakes (pictured) were available for $200, I pounced. When I was being quoted for the calipers only the prices were around the $400 mark. So clearly the S14 brakes were too good to pass up. I then managed to swap my S14 calipers for a set of lighter but similar Z32 300zx items, so they went on instead.
My Choice on the White Sileighty: R33 Brakes
Twelve years later, I found myself needing to upgrade the standard brakes again. I figured I would go for the largest bolt on upgrade that was readily available. I purchased some second hand calipers and discs from a forum for $230 delivered, but purchased and used new DBA R33 rotors, which were $260 delivered with some generic pads (that will sit on the shelf forever). Please note that traditional parts shops wanted over $200 per disc so it pays to shop around, especially online.
Redrilling Discs
If retaining 4 stud, the new discs need to be redrilled. The redrilling process is quite simple but great care must be taken to ensure good accuracy. After all, these are the car’s brakes, which is something no one ever wants to have fail. If the discs are redrilled incorrectly then the disc will be out of balance and cause vibration at best.
Fortunately as the discs are both x * 114.3 stud pattern, this means the holes are the same distance from the centre. In short, one of the original holes can be retained, meaning only three others need to be drilled. Make sure to orientate the disc so that you will be drilling through fresh metal and not any of the previous holes.
The two discs are placed hat to hat with the 4 stud item on top, and then a plastic dowel is pushed in between the two matching holes to keep them aligned. I then pushed a scrap piece of tapering blue foam down the centre holes to give them a rough alignment and dampen any vibrations from the drill. Lastly a clamp is placed around the meeting points of the two hats and tightened so that they are held firmly in alignment.
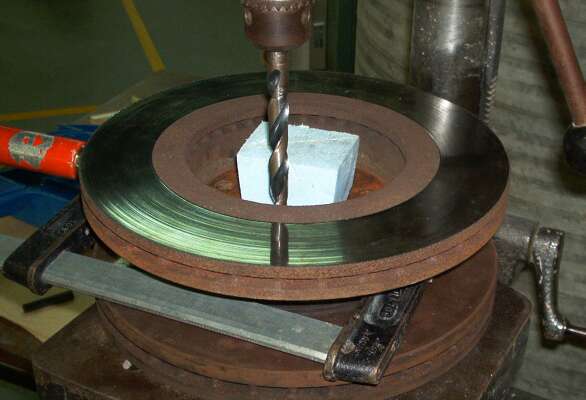
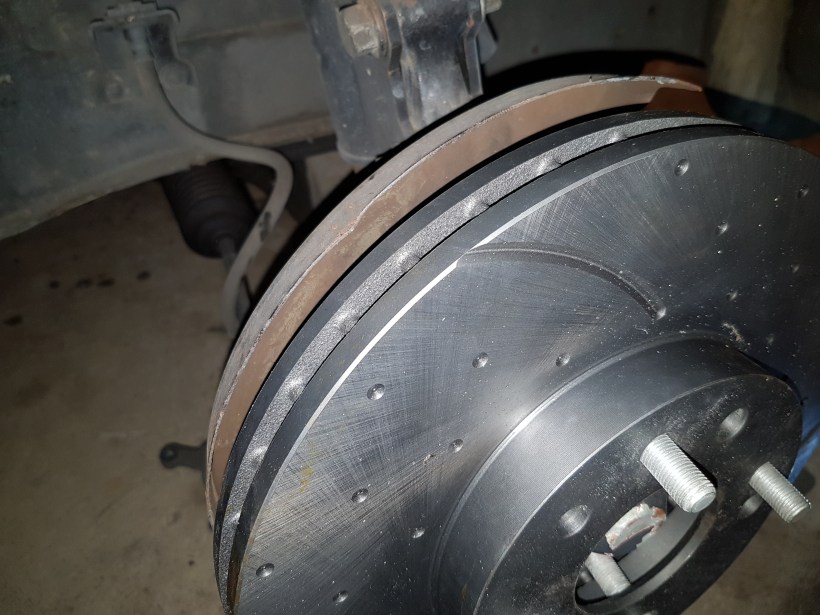
Now drill the three new holes using the 4 stud pattern disc at a template. Check that the bit is centred in the hole before drilling to ensure accuracy. Next use a much larger drill bit or a countersinking bit to drill a slight indentation around the top of the holes as shown. This not only looks good but helps remove dags from the fresh holes, and assists when the disc is slid on to the studs.


Second Hand Discs: Surface Cleaning
Usually here you would pay to have the discs machined to ensure trueness and surface quality. However, since the discs appeared to be in much better condition that my original discs I assumed they only needed the surface oxidization cleaned off. To clean up the surface, I simply used some medium grit wet and dry sandpaper and lightly rubbed until the surface was shiny again. New discs do not require this step.


Disassembly of S13 Front Brakes
This process is quite straightforward and can be attempted by anyone with some half decent hand tools.
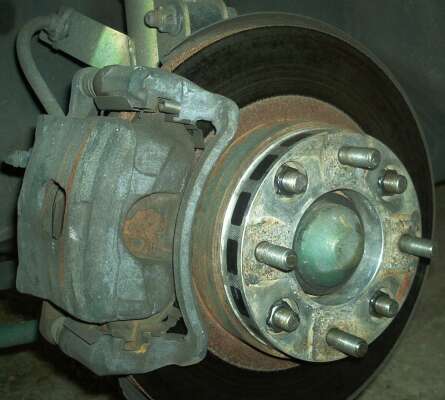
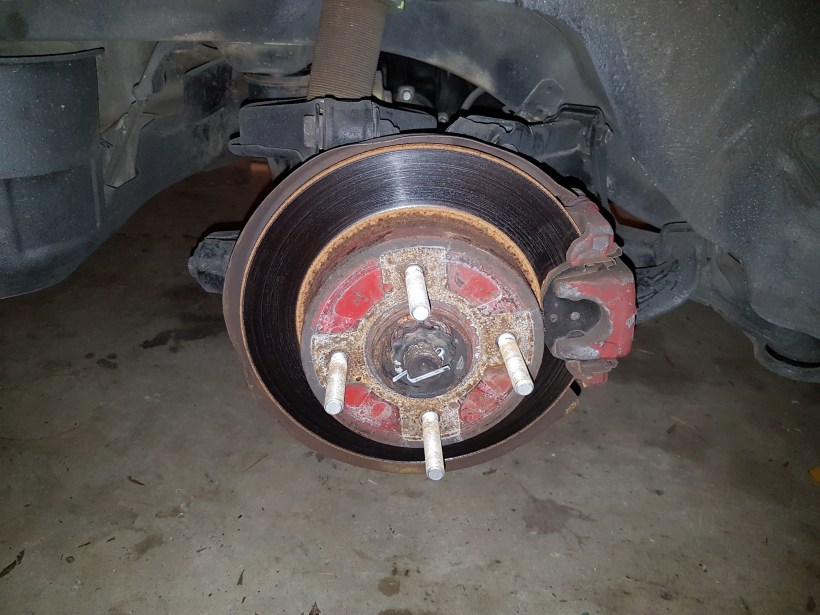
First remove the wheel. Seen here on the left were the 20mm bolt on spacers fitted to the grey 180 that have to be the safest type of spacer available. They bolt on the studs from the hub and then have their own new studs that the wheels bolt to. On the right is an image of the stock brakes from my white Sileighty, partially disassembled and showing the large single piston in the caliper. Really long studs but no wheel spacers needed for this car as the rims are perfect in offset.
 |
 |
The calipers unbolt via the two sets of bolts on the rear side. One pair is 14mm and the other is 17mm. Once both are removed the calipers will slide straight off the disc. Now in the centre of the disc are two small threaded holes. Screw a spare bolt in one of these and the discs will become free from the hub and slide off. A light whack with a rubber mallet will also relieve the disc. Too easy!
Dummy Fitting
With S14/ S15/ R32/ Z32 discs, the only problem is the clearance between the protective backing plate and the new thicker disc, which is to be expected. On the lower right hand it can be seen where the plate fouls on the disc surface. A few hits with a hammer fixes this.


The larger R33 setup is a different story. The backing plate is a similar diameter to the disc and this meaning the entire outer edge of the backing plate will foul. It needs the entire edge trimmed or the entire plate removed.
As expected, the calipers bolt straight up in either case to the existing mounts, and sit nicely over the discs. For S14/ S15/ R32/ Z32 calipers, a small section of the backing plate will need to be trimmed but an angle grinder will make short work of this.


Removing the Front Baffle/Backing Plates
I started trimming the backing plate in the Sileighty to make way for the R33 setup, but after the first corner, I decided to remove them instead. It was difficult to make a uniform and smooth cut to the plate, either with a nibbler or grinder. The plates would not be symmetrical across the car, and the jagged edge left from the tampering would be hard to tidy up.
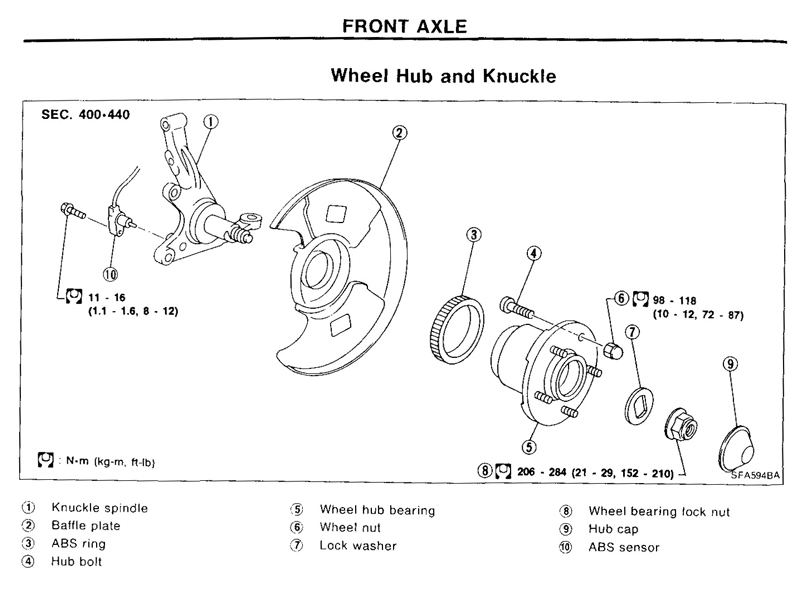
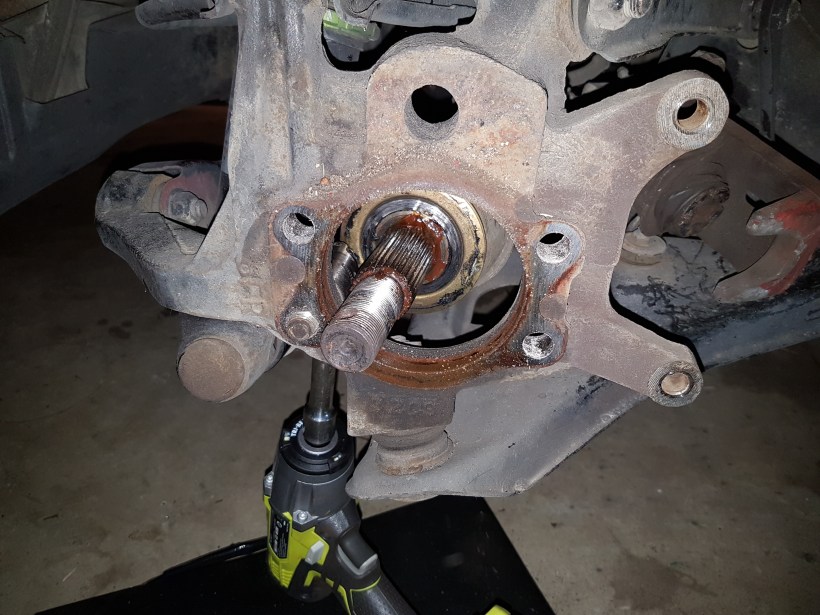
An exploded view of the front hub assembly as taken from the service manual can be seen below. The image is for an S14 model but the basics are the same. If your car does not have ABS, then those parts will not be fitted. Once the cap and split pin are removed, a 30mm nut hold the hub and wheel bearing on. Undoing the nut is easy because there is no front axle to spin, meaning the car can be up on axle stands and the hub is not required to be held still to stop it rotating. Apply penetrant oil, attach breaker bar, and stand on it to crack the nut. Be careful not to jolt the car too much on axle stands. The plate might need a screwdriver levered between it and the knuckle to work it free.
Here the S13 hub can be seen reassembled without the backing plate.

The R33 discs and calipers can now be dummy fitted without issue. It is also a good idea to dummy fit the wheel to ensure adequate caliper clearance before proceeding.


Rear Brake Upgrade
On the grey 180, the rear brakes were never upgraded beyond pads. R33 rear brakes on an S13 is becoming more popular but requires significant alteration. R33 rears have a drum setup for the handbrake in addition to twin piston calipers for the disc. A fair bit of mucking around is required to adapt all of this.
Instead, I found a larger disc upgrade package on GKTech. It provides a larger 300mm disc (up from 258mm) with caliper spacer blocks to reposition the standard single piston calipers to suit.

Standard 258mm rear disc versus HFM 300mm upgrade:

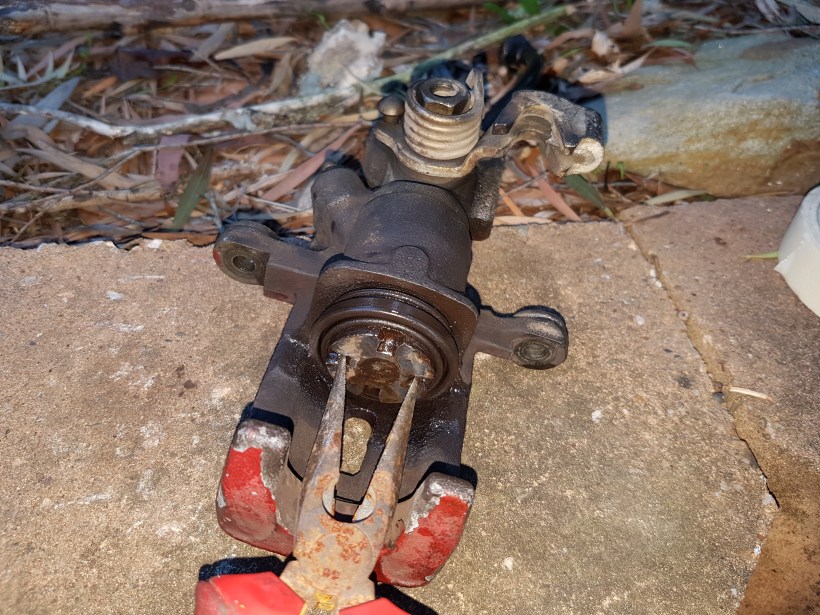
Disassembling the Rear Brakes
This is very similar to the fronts, with the centre part of the caliper bolted to the caliper frame, which is bolted to the knuckle. Once the caliper is free from the disc, it will still be attached via the rubber brake line and handbrake cable/mechanism. It’s ok to leave these on and simply position the caliper to the side until it needs to be completely disconnected.
The standard rear brakes before disassembly:
Dummy Fitting
The larger disc was even more problematic than the front R33 discs. The backing plate would once again need severe pruning or complete removal.
Removing the Rear Baffle/Backing Plates
This one is a lot more time consuming than the fronts. An exploded view from the FSM is shown below, once again from an S14. The rear brakes on S13/ S14/ S15 are the same and this diagram was accurate. The centre nut must be removed and after this, four bolts need to be removed from rear of the knuckle.

Cracking the centre 36mm axle nut is a notorious task amongst S13 owners due to its difficulty. The axle/hub/wheel must be secured or the assembly will just spin with the nut. At this stage I had to reinstall the standard brakes to use the handbrake. If you know you will be removing the plates, do this step before anything else. Remove the split pin and flower shaped cover, apply the handbrake and put the car in gear. Penetrative oil also helps. A breaker bar attached to a 36mm socket will crack the bolt with some luck. Mine came with body weight on the breaker bar, but you may not be so lucky. I recall a torrid time cracking this nut on an earlier car. Alternatively, a really powerful rattle gun might make the job straightforward.
The next step is to undo the axle shafts from the differential. This will allow the axle to be slid towards the diff to create the required space at the rear of the knuck to access the 19mm bolts (pictured below).You can sit facing the assembly instead of lying on the ground to remove the 19mm bolts. The backing plate will come off with some screwdriver leverage just like the fronts. Reassemble.
Installing the HFM Caliper Adaptors
These are fairly straightforward to install. The hex cap head bolts attach the adaptors to the standard knuckle. It is advised to use thread locker to ensure integrity. The nuts and bolts supplied are imperial, not metric. They require a 5/8″ spanner/socket. You could potentially replace them with high tensile metric hardware.
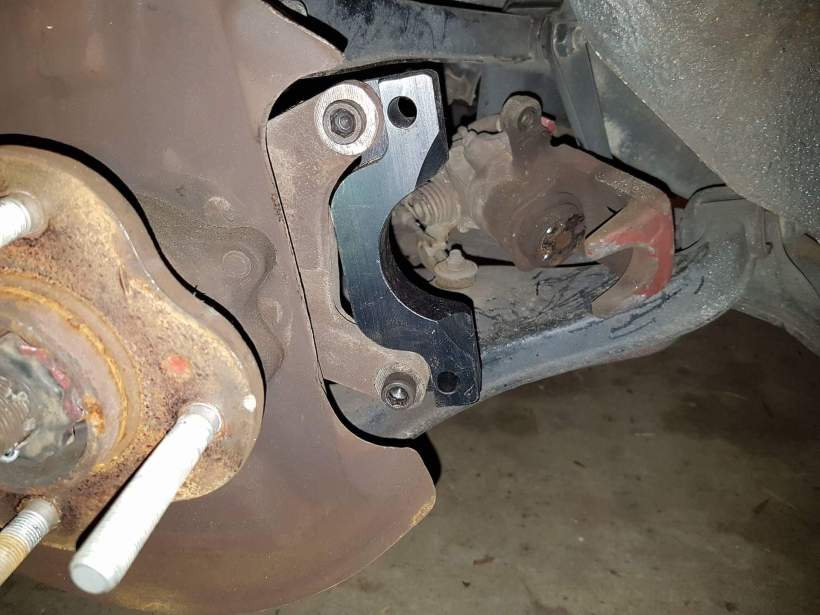
The new disc and spacer can now be dummy fitted.

Painting the Calipers
My second hand R33 calipers were supplied in gold and red, as in a different colour each side. I made the decision to paint all of my calipers gloss black to keep with the theme of the white and black Sileighty.
Any second hand caliper will be covered in brake dust and other grime. They need to be prepared well for the new paint to take. I had a set of drill mounted abrasive attachments sitting around for years. This was finally the chance to use them, especially considering the alternate is a a lot of scrubbing with a wire brush. They removed the grime very well.

The picture below is a before and after of the cleaned front calipers. The silver one used to be gold. You don’t need to remove every little bit of the old paint, but try to provide a uniform and clean surface.

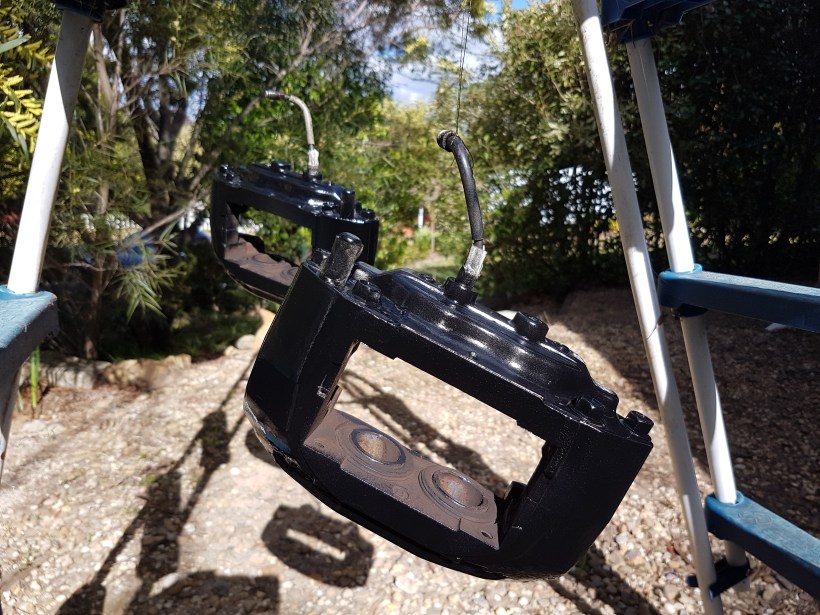
High temperature caliper paint is needed. I wiped the parts down with wax and grease remover, masked some key bits, hung them up and applied the paint. You are meant to build up layers, 10 minutes apart, but I was impatient and did it in one. There are some runs but I don’t mind. They look great from normal viewing distances.
Pad Selection
Selecting the correct pads may seem tricky after mixing and matching parts. The good news is that S14/ S15/ R32/ Z32/ R33 four piston calipers take the same pad. S13/ S14/ S15 all take the same rear. For the combination on the grey 180sx and white Sileighty, I could simply shop for S15 pads. Because the S15 was sold locally, the pad should be easy to track down. If you were to upgrade the rear brakes to R33 twin piston calipers, you would shop for R33 brakes all round.
Pad selection is subjective and googling any particular pad seems to have varying testimonies online. Things to consider are brake dust, noise and most importantly: temperature range. A track car will need pads rated for higher temps, but often this means cold performance is compromised. If you drive your car to the track, you don’t want to crash the car just after leaving because the cold pad wouldn’t stop the car properly. For this reason I went for a high end street pad, instead of a track pad.
Preparing for New Pads and Reinstallment
All calipers account for pads wearing and thinning over time. The caliper(s) slowly move in as the pad wears. When installing new pads, they need to be reset to their starting position or the new, full thickness pads won’t fit.
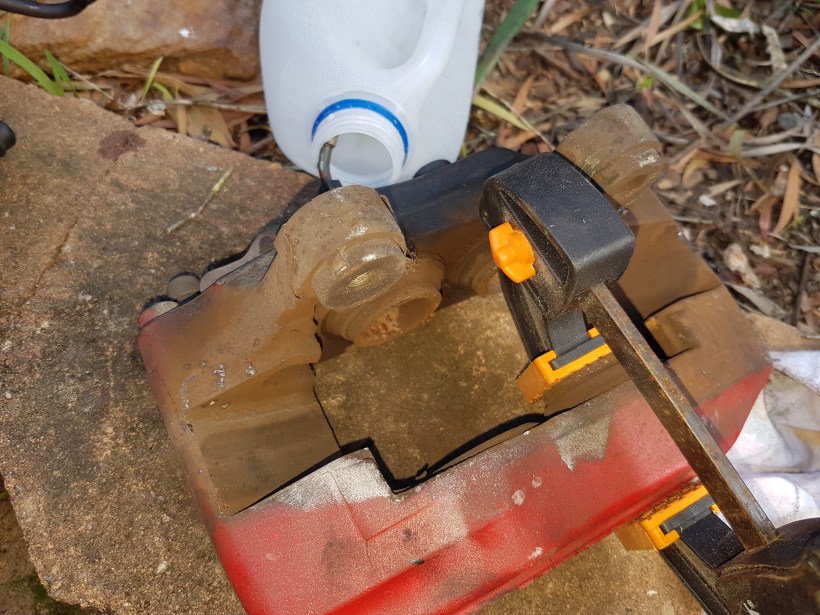
The new fronts (and also the factory calipers) just need each piston squeezed back in. I used a clamp with rubber surfaces to achieve this. Brake fluid will travel back through the lines. If they are off the car, capture it in a container as pictured. If on the car, open the brake fluid reservoir and prepare for spills as the level rises.
The rears on an S13/ S14/ S15 are tricker. When removing them, the lines and the handbrake attachment must be unbolted. There is a 14mm bolt on the underside to remove and then the end of the cable slips off. First, lubricate the rubber boot with WD40 and then use needle nose pliers to screw the caliper back in. Take great care not to puncture or tear the rubber boot, or you will have a brake fluid leak.
Brake Line Variations
Standard S13 brakes use a banjo bolt to connect the rubber line to the caliper. This is hollow and allows the fluid to travel down the middle of the bolt. Sealing is achieved by the two copper washers being slightly crushed when the bolt is torqued sufficiently.

Other cars have flared lines, that have male and female V shaped sections that clamp against each other to form a seal. S13s have this from the metal brake lines to the rubber hose, and then banjo bolts from the rubber hose to the caliper.


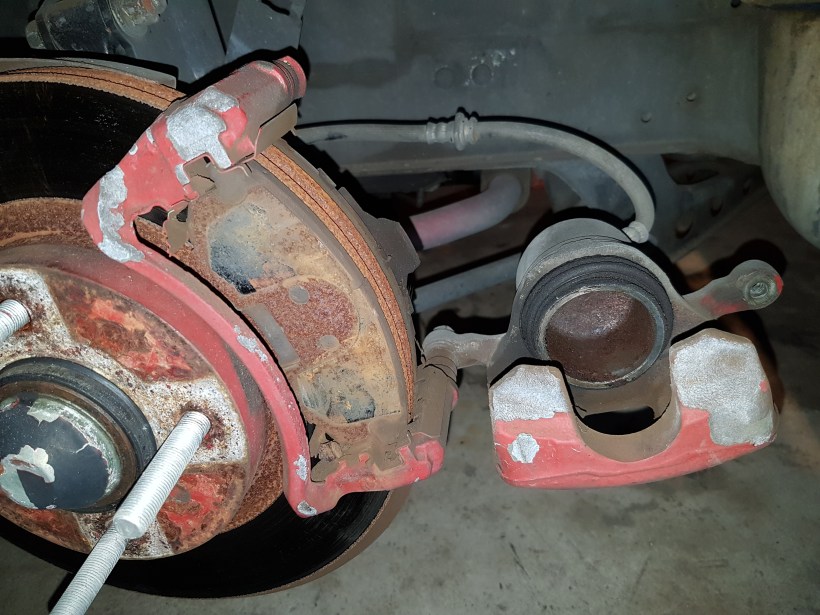
R33 calipers have a hard line with flared fitting into the caliper. The tapered joining surface inside the caliper, often called the ‘olive’, can be seen below.

Standard S13 lines can still be used, but, the banjo bolt must be trimmed down by 3-4mm to avoid hitting the olive before the banjo is fully inserted. Alternatively, some people drill out and remove the olive so the banjo can insert normally.
For the white Sileighty, I fitted braided stainless steel lines, sourced from GKTech. They had a flared fitting on the fronts to suit the R33 caliper, and a banjo bolt on the rears to suit the standard calipers. Given this, I’m not how they would be compatible with the standard S13 front calipers.
Please note that the front braided lines must be installed onto the R33 calipers before the calipers are fitted to the car. It also makes sense to install the rear lines to the rear calipers first too.
Fitment
Fitting the larger front brakes after backing plates and lines are sorted is a breeze. With rubber lines, you simply clamp the brake line to limit leakage, unbolt the caliper and banjo, and bolt up the new one. The Z32 brakes under 16 inch wheels on the grey 180sx:


The hard lines are easy to access at the front of the car, and offer little trouble if fitting braided lines. At the rear, I couldn’t access them without lying on the floor underneath the car. Please always use a flare nut spanner when dealing with flared brake lines. Normal spanners will likely round them and leave the car undriveable. 10mm is the correct size for S13s. Use WD40 or penetrating oil to help loosen them too. Some brake fluid will inevitably spill during the change. I made up some plugs for the hard lines to fit while I was painting the calipers:

They are simply bolts jammed in rubber hose to slip over the flared fitting. They didn’t stop leaks, but slowed them down a great deal. Don’t forget to check and top up the brake fluid reservoir as the fluid level drops.
The upgraded brakes installed on the white Sileighty, looking pretty in gloss black:


Bleeding
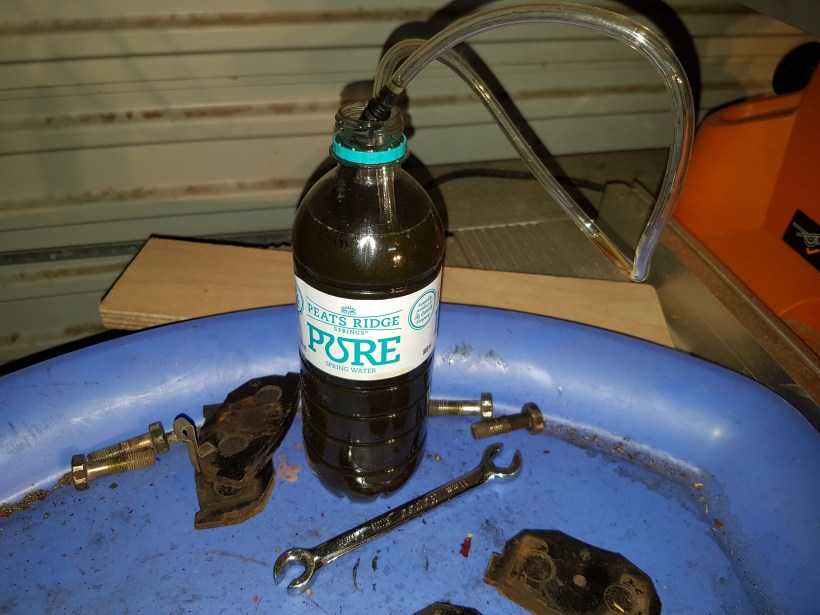
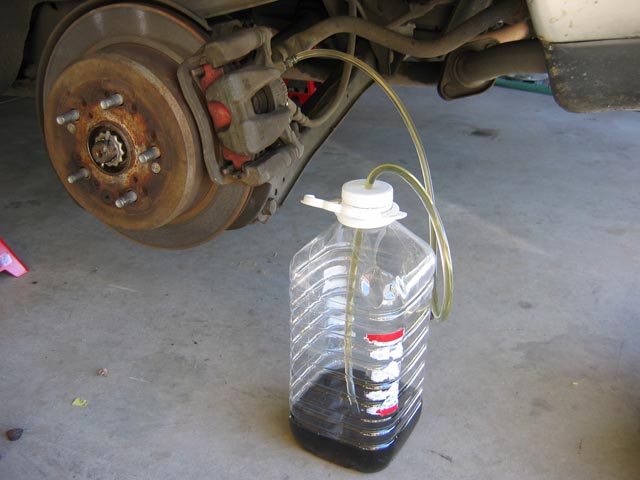
This must be done even if you haven’t changed the lines. Failure to do so will likely result an accident and even death. After changing the lines, there will be a lot of air in the system. I purchased a brake bleeding kit like that pictured below. It is simply a rubber tube that goes over the caliper bleed valve, connected to a clear hose so you can see what comes out of the valve.
The process is well documented, but basically you pump and push the brake pedal before opening and closing the valve. Air and fluid will come out, and you need to keep going until only fluid comes out.
Start furthest from the master cylinder and work towards it. On a right hand drive S13, according to the FSM. this means rear driver, rear passenger, front passenger and finally front driver.

I had a lot of fluid come through to get rid of all the bubbles. Don’t forget to keep topping up the fluid in the reservoir. Failure to do so introduces bubbles and whole thing has to be started again.
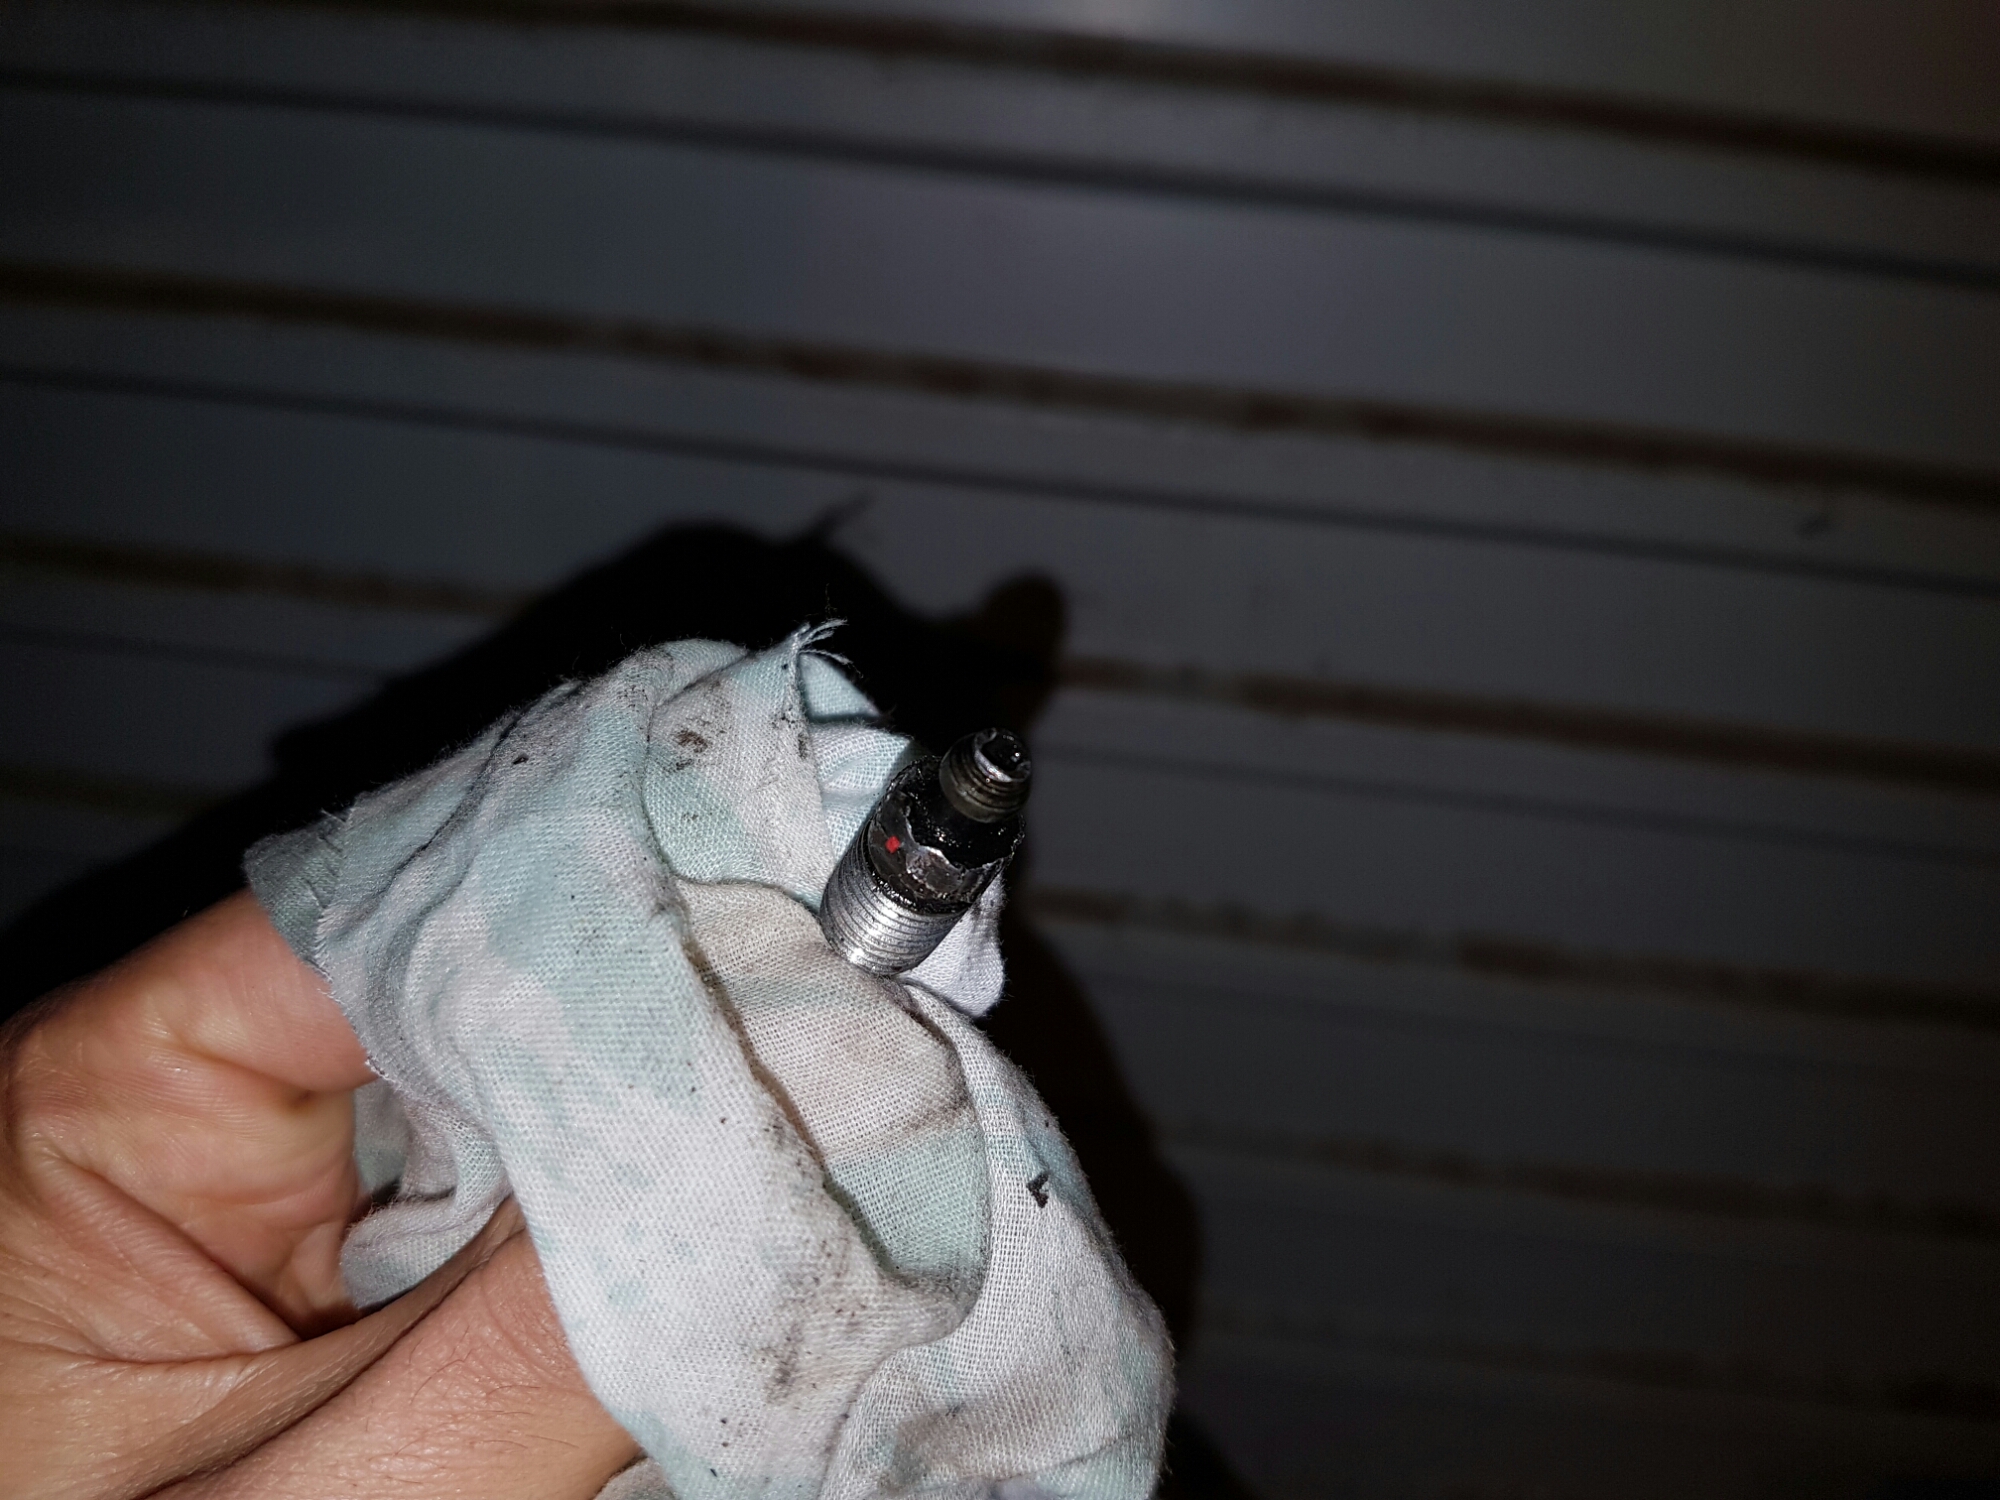
Another issue I had was the rear calipers had been butchered by a previous owner. The bleed valves were rounded. I had to use vise grips to loosen them and then replace them with the valves from my old front calipers. I didn’t check this while they were off the car. Hindsight is a lovely thing.
Bedding In Pads and Rotors
New pads and/or discs need to be bedded in. This usually means gentle braking from gradually higher speeds, with designated cool down periods. Failure to do can greatly reduce the life of the components. Please consult the instructions that come with the pads/discs.
My discs and pads came with conflicting instructions. I combined them as best as I could. After some very light initial braking, I completed a cycle of 10 medium pedal presses to take the car from 60 to 20 km/h. I then parked the car to let the brakes completely cool, and then repeated the entire process. The brakes will then be ready to use properly on the next drive.
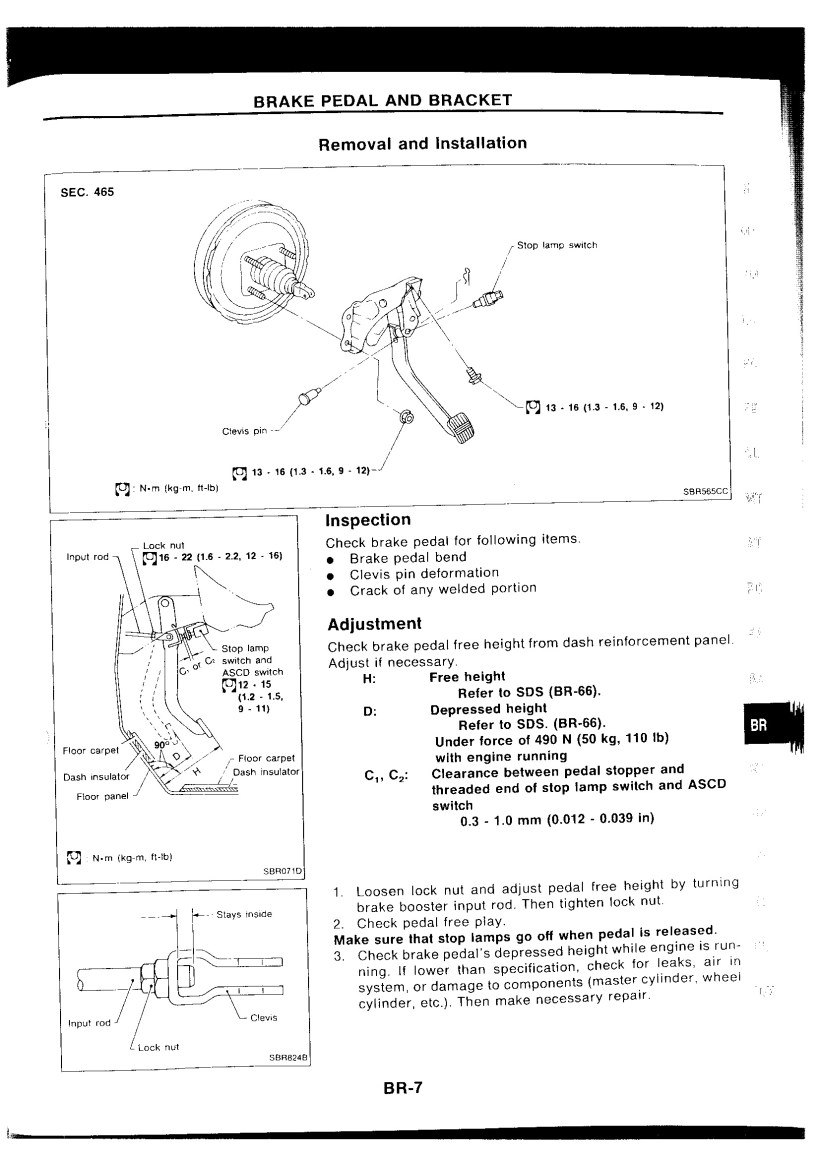
Adjusting Brake Pedal Position
The input rod behind the pedal can be rotated to change how far the pedal must be pushed before the brakes engage. I personally like the brakes to engage with bite near the top of the pedal travel, so therefore this pedal position can be achieved by winding the input rod clockwise towards the master cylinder. This means that with minimal pedal application, the rod will start to engage with the brake fluid to push it through the system and apply the brakes. The opposite applies for someone who wanted the pedal to have to be moved a fair way before the brakes engage.
This job is simple but painful. Once the 14mm locking nut is loosened, the input shaft must be twisted, but it is very hard to see and get a hand to at the same time. I ended up using needle nose pliers to grip it, but there was only room for 1/10th of a turn each time. Very frustrating. Tighten the locking nut and be sure to adjust the brake light switch too if you have changed the input rod significantly. You don’t want the brakes engaging before the lights come on. The FSM diagram for adjusting the pedal is seen below. Unfortunately page BR8 is missing from the FSM.
Brake Master Cylinder Stopper
The brake pedal is mounted to the firewall with the master cylinder on the other side in the engine bay. When the pedal is pressed, a significant amount of flex occurs in the firewall. The pedal travel is still transferred to the brake calipers, but sponginess can be felt through the pedal as the fire wall flexes. Watch this video to see just how big a problem this can be.
Enter brake master cylinder stoppers. They bolt onto the strut tower and have a pad which screws up hard against the end of the master cylinder so that it can no longer move from fire wall flex. GKTech sell an easy to fit item for an affordable price. It comes with all o the parts required and it is true ‘bolt on’ modification. In fact, nothing even needs disassembly.
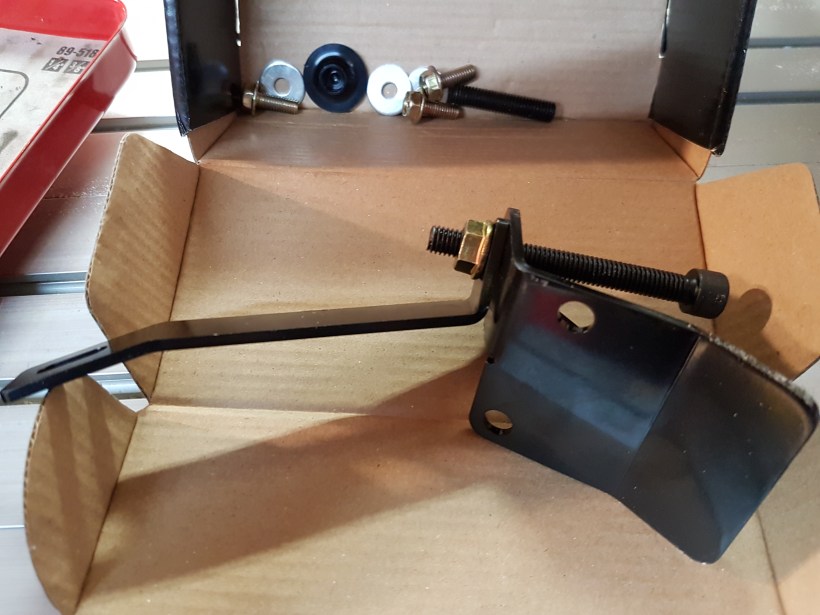
Nissan provides a bunch of welded in screw threads on the strut towers which are sealed with plastic bungs. To start, you line up the assembly seen above to determine the three needs and pull out the bungs. The supplied 10 mm head bolts then secure the bracket pieces to the strut tower. The one under the master cylinder by itself is very fiddly. To make more room, unplug the electrical connector from the master cylinder. Before tightening all three bolts, start to screw the hex head bolt into place with the matching locking nut to ensure the two brackets are aligned. If everything is good, simply tighten the bracket bolts then turn the stopper screw so that the pad on the end pushes firmly against the master cylinder. Lock it in place with the nut and you’re done!
It should look like this:

Driving Impressions
When the grey 180sx was upgraded, R33 brakes were removed from the previous owner and returned to them. This meant I couldn’t make the comparison between stock and Z32 brakes.
The white Sileighty, however, went from completely stock with average pads to larger front and rear with performance pads . At the time of writing I have only been able to drive the car once after bedding in, but it is clear that this is easily the best braking car I’ve owned. The stock brakes worked, but there was a worrying feeling that they were woefully inadequate for the power the car is making. For whatever reason, the car has a lot of grip, meaning it is hard to lock the brakes, even in the rain. The car now generates a lot of g-force as it slows.
The master cylinder stopper did firm up the pedal as it is designed to. It’s not obvious in general driving, but a hard stop feels more direct and dare I say safe.
The real advantage will be seen on the track. The major issue with standard brakes is when they fade. Braking is the process of converting friction to heat. Once the discs/pads are saturated with heat and cannot take anymore, they stop working. The much larger discs front and rear will have a huge increase in thermal mass and therefore increased resistance to fade.
