*When originally written, this page dealt with the Nissan ECU theory, products, installation, etc. At that stage, the products were very primitive. I will attempt to rewrite the page keeping what is relevant from the past, but discussing and comparing the newer technologies.*
The basic theory behind retuning the factory ecu is to alter the fuel and ignition maps amongst other things like the rev limiter and speed limiter. These maps are the only thing altered, so the excellent factory controlling of idling and air conditioning remains intact. The main advantage of using the factory computer is the low cost, as very little hardware is required. Compared to the price of purchasing and installing a complete replacement aftermarket ecu, the savings are immense. The modifications are reversible too, as the wiring loom will remain untouched. This gives an advantage over more the budget orientated approach of fitting a ‘piggyback’ computer, which still requires wiring loom changes. The cheapest plug-in replacement aftermarket computer is the Apexi Power FC. There is no doubt over the quality of this product, but at around $2000 it is out of reach for many enthusiasts.
Eligible Nissan Vehicles
The list of Nissan vehicles used to be much smaller than it is now. A Japanese website, 925style, used to be the go to for software and maps. In 2016, Nistune has dominated the market with its wide vehicle support, extensive functionality and affordable products. They sell different boards to suit the various Nissan ECUs, with functionality changing between these. The easiest way to see if your car is supported is to look at their products page. The following was reproduced in August, 2016. Please follow the link above for the most up to date list.
| NIStune Type 1 Board $260.00 AUD $286 AUD (w/GST)CR31 Skyline (RB30E) HR31 Skyline (NICS/ECCS RB20DET) VL/Turbo Commodore (RB30E/RB30ET) Z31 300ZX (VG30E, VG30ET) 1986-1989 A31 Cefiro (RB20DET) J30 Maxima (VG30E) S13 Silvia (CA18DE/DET) S13 Stanza / 240SX (KA24E) N13 Pulsar (CA16DE) N13 Pulsar (CA18DE) U12 Bluebird (CA18DE) |
NIStune Type 2 Board $240.00 AUD $264 AUD (w/GST)M30 Infiniti (VG30E) ECR32 Skyline (RB25DE) ECR33 Skyline (RB25DET)* HCR32 Skyline (RB20DET) BNR32/BNCR33/BNR34 Skyline (RB26DETT)* Q45 Infiniti (VH45DE)* U12 Stanza / Bluebird (KA24E) Y60 Patrol (TB42E) Z32 Fairlady 300ZX (VG30DE/DETT)*See notes on information page for these models |
| NIStune Type 3 Board $260.00 AUD $286 AUD (w/GST)S13 180SX (SR20DET) S13 Silvia (SR20DE,DET) S13 240SX (KA24DE) U13 Bluebird (SR20DET) B13 Sentra/NX2000 (SR20DE) P10 Primera (SR20DE) J30 Maxima (VE30DE) S14 Silvia (SR20DET) [early model] N14/N15 Pulsar (SR18DE, SR20DE) RNN14 Pulsar (SR20DET) |
NIStune Type 4 Board $280.00 AUD $308 AUD (w/GST)B14 200SX SE/SE-R / Lucino GSR/GSE (SR20DE) [upto 1997 only] K11 Micra (CG10DE/CG13DE) [later model] N15 Pulsar (GA16DE) N15 Almera GTi (SR20DE) G20 Infiniti P10 (SR20DE) [upto 1997 only] P11 Primera (SR20DE) [upto 1997 only] S13 180SX “Type R” / “Type X” (SR20DET) S14A Silvia/200SX (SR20DET) S15 Silvia/200SX (SR20DET) S14 240SX (KA24DE) ER34 Skyline (RB25DET) WC34 Stagea (RB25DET) [Late Model & JECS ECU] U13 Altima (KA24DE) [upto 1996 only] Y33 Cedric (VQ30DET) |
| NIStune Type 4 Dual ROM Board
$300 AUD S14 240SX (KA24DE) [1996 only] |
NIStune Type 5 Board
$260 AUD S14 Silvia (SR20DE) Half size ECU |
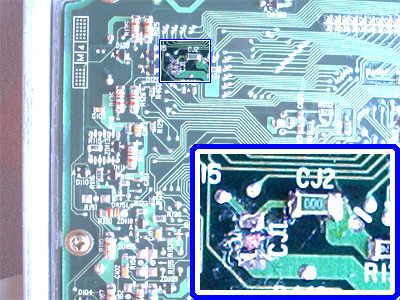
The most expensive board is $330, and whilst some other equipment may be needed to install and tune the board, it still represents outstanding value for money. For almost all SR20DETs, we use a type 3 board. For the SR20 engines, the fuel and ignition maps are inside the ECU. That is, the maps are not found in an accessible chip that can be changed by the user. Therefore, an expansion or daughterboard is required that connects to the factory ECU. This daughterboard introduces the same type of factory chips which hold the fuel and ignition maps, except they are in the daughterboard and not the ECU. The board is basically a device that tells the ecu to take the maps from itself instead of the internal memory of the ECU. Therefore, the ECU can be returned to standard simply by removing the daughterboard, and the ECU will return to reading from its factory programming.
Types of Chips
There are three main type of chips available to suit the daughterboard. These are EPROM, EEPROM and Flash. Some daughterboards use two cheaper chips, in an ‘odd and even’ configuration. For example, this means that two 8 bit chips are used to make a virtual 16 bit chip. To do this, the maps are burnt onto the chips split in half, with odd data on one chip and even data on the other. The daughterboard is engineered to read automatically between the two chips and merge the data electronically for the ECU to read. This is no great hassle, as the software for tuning and also that for burning the chips has functions built in to automatically to deal with the odd and even system. The S13 SR20 ecu is 256 kbits, so the minimum size chips to be used would be twin 128 kbit chips, and these would hold only 1 map. Two 256 kbit chips will give a total of 512 kbit, and therefore will hold two maps. Two 512 kbit chips will collectively give 1024 kbit and hold 4 maps. Remember that this will vary from car to car, as the size of the factory ECU is different from model to model.
EPROM Chips
These are the cheapest and most simple of the available chips, and are those which come with the first generation of daughterboards such as the BadBiki daughterboard. The default chips are two 256 kbit units, so they hold two maps as stated above. The major downfall of EPROM chips are the way they are erased. To delete the content of the chip it must be exposed to UV light. One way to do this is to leave them in the sun for a few days. To be any more more efficient, an investment must be made in a UV eraser. These can be quite expensive but offer faultless chip erasure in only a few minutes. EPROMs are suitable for the user that will not be altering the tuning very often, or one who has access to a UV eraser. There is no reason with these other facilities available that EPROM chips can give years of faithful and reliable service.
EEPROM Chips
The next step up is the EEPROM chip. The trump card of the EEPROM is that certain types can be electronically erased with the same hardware that burns them. Beware though, as some are single use only, and will be specified so. The lesson is to double check before buying to save disappointment. Prices of EEPROM chips are about double that of EPROMs, but the cost of a UV eraser can easily make the difference. You must decide which cost will work out best in the long term. With the BadBiki daughterboard in my first round of S13s ten years ago, I personally invested in a set of 256kbit EEPROMs, fully electronically erasable and a direct fit. The chips were ordered from www.batronix.com under the part number of AT28C256.
Flash Chips
Flash chips are similar but work on different principles. They are similar to Compact Flash memory cards used in products such as digital cameras. The technology is newer and therefore more expensive. The price pays for a greater level of sophistication, with the entire process being a little slicker than the other forms of chip. The Nistune boards appear to use Flash memory for storing data.
(E)EPROM Burning Hardware
Nistune Type 3 boards do not require this, but to burn the older style chips you will need a chip burner. This is moderately complex piece of electronic hardware that connects to a PC by means of the parallel port or perhaps USB. Many kit forms are available on the internet where you either build the entire thing from scratch after buying the components, or purchase the components and PCB as a kit to assemble. Any person with competent electronics skill should be able build such a kit. If this is you than you are lucky because this will cost you very little. If you feel you are able then simply search the internet for “eprom programmer” or similar.
Unfortunately this was not me when using the BadBiki board. I had built a few kits in the past with varying success, but I was definitely not confident enough to build a programmer. I would either have to ask someone better build one for me, borrow, or buy a pre-assembled programmer. As I like the idea of owning it myself and few people have the time to building electronics for other people, I purchased a programmer from www.batronix.com.
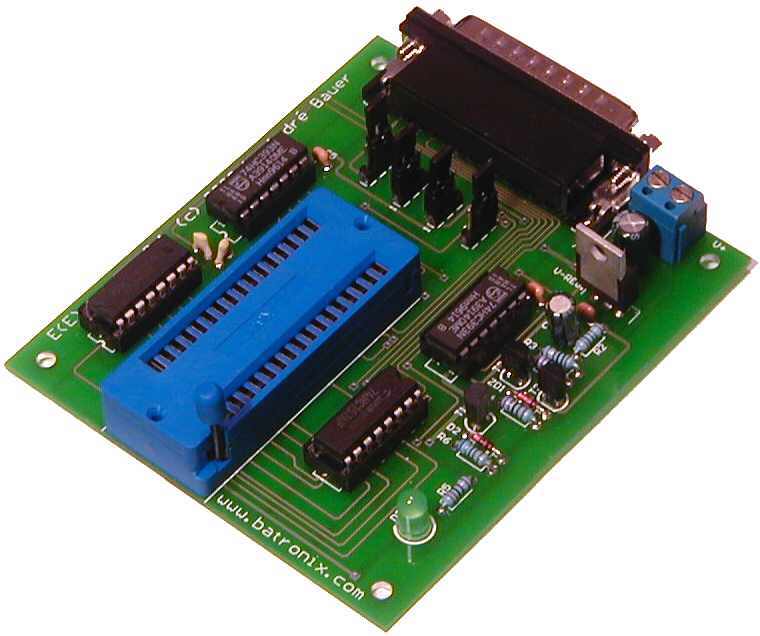
I purchased the Batronix EEPROM Programmer 3.3. The main reason I chose this product was because it supports EPROM, EEPROM and Flash chips! It programmed the chips that came with the BadBiki daughterboard, as well as the AT28C256 EEPROMs I had purchased at the same time. Below the programmer is pictured, with ZIF socket in place.
Chip Burning Software
The Batronix E(E)prom Programmer needs software to interface the computer with the burner. This software is fairly straightforward to use and will perform odd/even burner with ease:
I previously wrote a tutorial on this ten years ago that went into great detail, but since the process is now redundant with the popularity of Nistune, I will not reproduce it here. An archived version of the page is available here.
Daughterboard Installation
Installation is the same for the previous BadBiki board, and the newer Nistune variants. Nistune have video and pdf guides for each type of board they sell which can be found on their website.
On a Type 3 SR20DE(T) board, installation is fairly straightforward, with only basic tools required. Electronics knowledge needed is minimal, just a decent soldering iron to ensure neat connections. When knowing exactly what needs to be done, the entire process could be completed in around half an hour.
Items Required
The minimum items required are as follows:
| Daughterboard | Just to make sure people are paying attention |
| Socket (supplied with board) | Remember this too! |
| Socket set | Removal of ecu from car |
| Soldering iron | Installation of socket, etc |
| Solder braid or a solder sucker | Removal of factory solder |
| PCB cleaning spray | Removal of factory applied protective sealant |
| Phillips-head screwdriver | Opening of ecu casing |
Optional items are as follows:
| Bubble wrap | Insulation and protection of board |
| PCB protective insulation spray | Resealing of soldering |
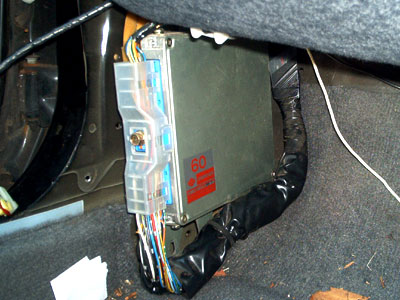
The ECU is located in the passenger side kick panel.
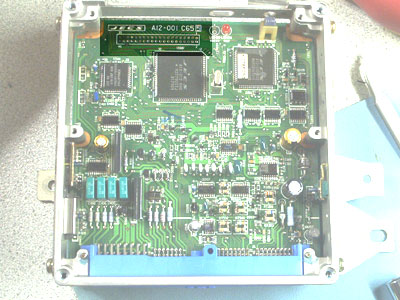
Inside, a row of unpopulated headers can be seen.
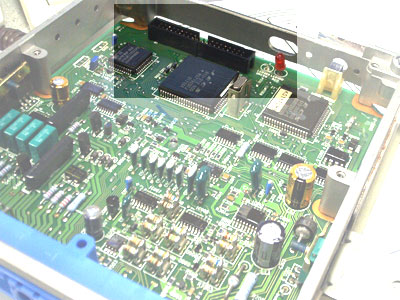
The solder must be removed and then the header plug soldered in place.
Each ECU will have a jumper that needs to be moved to instruct the ECU to read the maps from the daughterboard instead of internal memory. Refer to the instructions for your daughterboard.
Finally, plug in the daughterboard, being careful to align the pins correctly, and optionally put something around the board to prevent it moving. Reinstall ECU to car.
A Nistune video for this process can be seen below:
Old Tuning Software
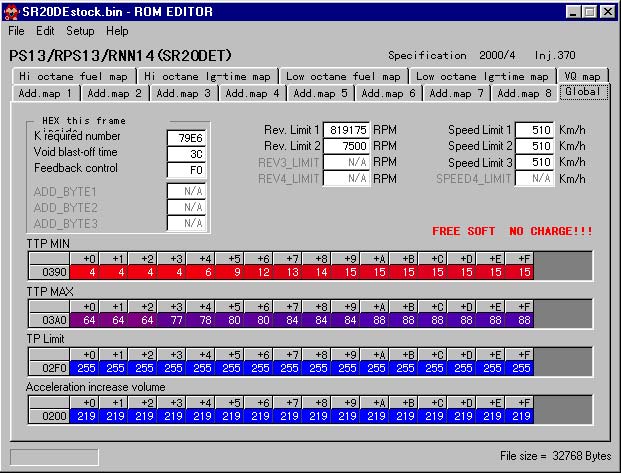
Each type of ECU needs an address file and a ROM file. The ROM stores all of the tables and parameters used to run the engine, and address file tells the software what part of the ROM is what. Both of these files used to be hard to come by and I used to host as many as I could find.
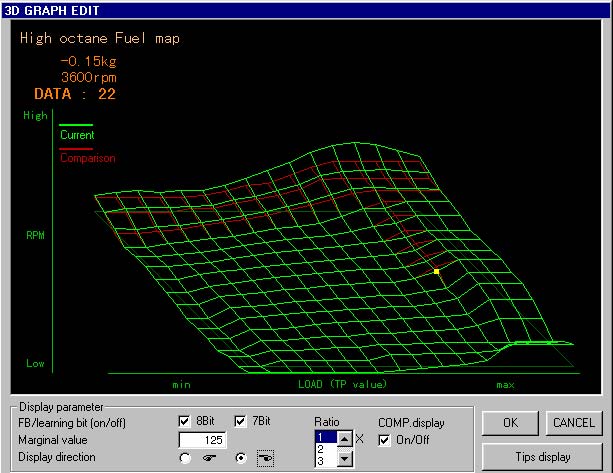
A decade ago, users had to use a piece of software called ROM EDITOR by Takuma Matsumoto that he offered for free on his website www.925style.com. You loaded the correct address file, then the ROM, before the various maps and parameters were accessible to edit. There was no real time feedback unless you had an expensive emulator. Without one, you completed a pass on the dyno, guessed where to make adjustments, removed the chip, burned the chip, inserted the chip and repeated. Pretty slow going work.
Modern Nistune Tuning Software
Nistune has made this part so much easier. They have address and ROM packs which contain everything you need for their products. The interface for the fuel and ignition maps are much the same as ROM EDITOR, but the entire package is much nicer to use due the logical menus and ability to have multiple maps open at once.
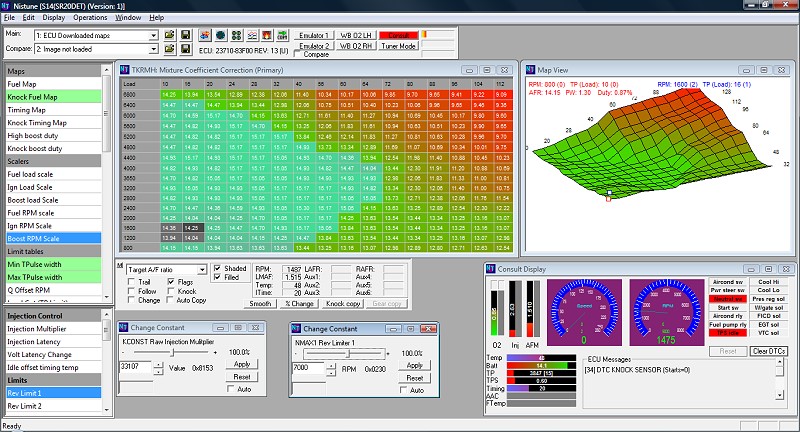
The Nistune software has no need for an emulator with Type 3 boards. You simply connect the laptop via USB to the consult port of the car and the software displays real time sensor data and mapping data. As the car is driven, the part of the fuel and ignition maps the ECU is accessing is highlighted. Changes are made in real time, then at the end are burnt back to the daughterboard. Ten years is a long time in the ECU tuning market.

Nistune offers feature packs depending the the board type. These add extra functionality where possible, such as factory boost control. The support section of the Nistune website offers extensive reading on their products and ECU tuning in general.
The following video gives a great overview of the Nistune software in action. The user only logs driving on the road, not the dyno, but the ease of use and features is easy to see:
The next video is by Nistune, and shows more advanced tuning like setting up parameters for non standard air flow meters and injectors:
Feature Pack Firmware
One of the main advantages of selecting Nistune is the ability to load ‘feature pack’ firmware. This works on the principle of replacing maps of little use to a modified car owner and using the programming space for other things. On my S14 model ECU for example, knock ignition and fuel maps are replaced with flex fuel maps for E85. Other additions are launch control and greater adjustment of the engine fan. One of the other great things is the introduction of the ‘total injection multiplier’, which is used to tweak fuelling in addition to K constant inbuilt into the ECU.
Previously when resizing injectors or changing the MAF, the K constant was the only tool available for tweaking the load and fuel scaling. If it were too far out, it would muck up the driveability of the car and bring on problems such as closed loop lean air fuel ratios being held as the car comes on boost. The key to success is to match your injectors and MAF to keep the K near stock. The combination of 740 cc injectors and a Z32 MAF is quite good because the extra capacity of each is similar and nearly cancel each other out.
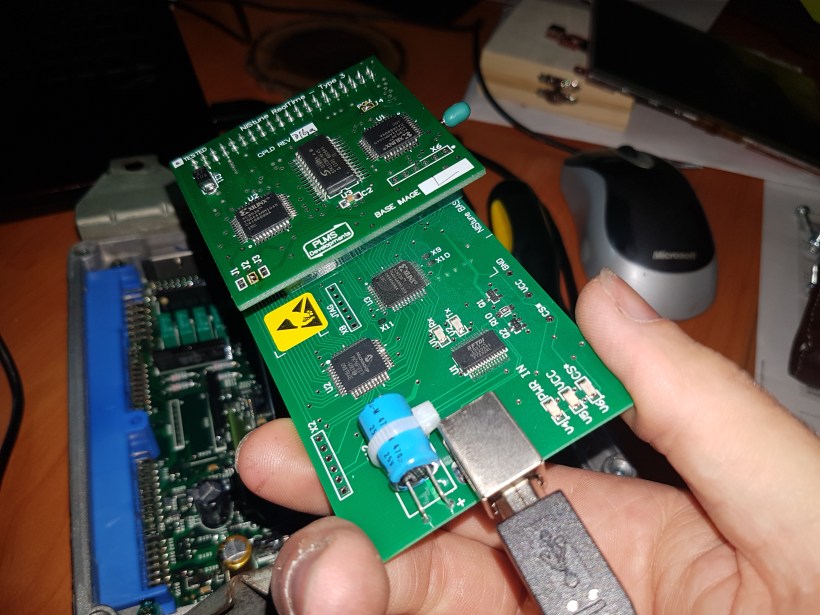
With TIM, the K constant can be tweaked in conjunction with TIM to get the load range and fuelling correct. Before this can be done, however, the FP firmware must be flashed to the daughter board with a Nistune Base Image Programmer. This is available for around $150 if you want to do it yourself. Alternatively, workshops charge around $50 to do this for you as a once off. I purchased my own so I can update if future feature packs become available with more features.
A good tutorial is available for flashing the firmware on the Nistune site. The process involves soldering and unsoldering jumpers on the board. The interface of the software is good for guidance, with images to make sure nothing is inserted backwards.
After this you load up the feature pack firmware and matching address file and the new parameters and maps will be listed on the left. There is also an option for importing your old non FP maps.
