Advancing the base ignition timing is a simple modification that can be done to almost any car. This is different to adjusting the ignition timing in the ecu, which varies according to load and rpm, but it will affect it directly. Say at 4000 rpm at 100% load (open throttle) the mapping inside the ecu might electronically run the car at 18 degrees Before Top Dead Centre. If the base timing is forward 3 degrees, then the actual timing will be 21 degrees BTDC.
Advantages and Disadvantages
Advancing the timing has the effect of increasing the efficiency of the engine by optimising the timing of the spark. The further forward is set, the more power the engine will make, and responsiveness will also be improved. The danger however, is that the engine will be closer to detonation, which spells doom for any engine. Detonation is uncontrolled pre-ignition in the combustion chamber, where at least one additional flame front ignites with disastrous consequences. Most of the time this flame ignites too early and then collides with flame produced originating from the spark plug. The piston may still be travelling up the bore in its compression stage, and is suddenly met with the force of the flame fronts trying to push it downwards, leaving no where for it to travel. The result is the piston rattling from side to side, which after not too long has the nasty effect of smashing the rings on the piston. This will result in loss of compression and increased oil consumption, if the engine will run at all. Another cause of detonation is lean fuel mixtures, which raises cylinder temperatures dramatically. Detonation resulting from this can be intense enough to melt pistons.
It is obvious then that detonation must be avoided at all costs. The easiest form of identification is a metallic rattling sound that is not entirely consistent with engine rpm. It can be hard to hear whilst driving, as the many other sounds around may drown it out. Special microphones can be made for little cost that clip onto the engine block, and amplify the sound for the listener. Several designs are outlined on www.autospeed.com.au, one of which I made with the provided instructions. This is highly recommended for the safety of your engine.
It may seem daunting after reading about the severe impact of detonation, but good gains can be made if the process is performed carefully. Two tips are to use the highest octane fuel available as this will increase the engines resistance to detonation, and to make little changes at a time until the final setting is known.
The Process (SR20DE)
Before you can ever think about checking the timing, you have to borrow or buy a timing light. These should be available from generic automotive stores such as Auto 1, Super Cheap Auto, Repco, etc. The unit pictured cost me around $50 and is a basic timing light. This is all that is required, so try and get the best value for your money.

The base ignition timing is controlled by the distributor on the SR20DE. Other engines may be controlled by a Crank Angle sensor, which works on a similar principle. To simply check the timing neither will be needed to be altered, as you will be essentially taking a measurement.
Timing is adjustable with both a distributor and a crank angle sensor by rotating the unit. To change the timing, the bolts holding the distributor to the engine need to be loosened. Not so loose the unit will move by itself, but just loose enough so that it will turn by hand. Note that base bolts are those required to be loosened, not the screws or bolts which hold on the distributor cap on. It should be obvious which is correct though, as the hole in which the bolt resides should be an arc, therefore allowing adjustment.

Fitting the light is simple. Clip the positive and negative leads onto the battery terminals (left highlight), and put the last clip around the wire going to cylinder number one (right highlight). The inductive clip is often fragile, so take care.
During use the timing light does not rest in position shown (centre highlight), this is just for illustrative purposes to show where to point the light.
Before starting the car, don’t forget to pull all wires out of the way of moving engine components.

This picture shows where the timing light is to be pointed, as shown in the picture above. In between the engine and the fan shroud is the spot on SR20 engines, and with better light than in the photo, you will be able to see pulleys. The marks will be on one of the belts or pulleys.

Start the engine and make sure it is up to the correct operating temperature before measurement. All accessories should be off, including stereos, air conditioning and headlights. This is because the engine must be at its correct idle speed for the timing light to be accurate.
A sticker like the one pictured may be found somewhere in the engine bay, and the ever important factory ignition timing setting. For the SR20DE it is 15 degrees BTDC.

For the SR20DE, the timing marks are as pictured. Only the lines are visible, so this picture is a handle guide to the actual values of the lines. The second from left is coloured slightly yellow, but this may be hard to see. A fixed notch will protrude above the markings on one of the pulleys. Pull the trigger on the light to see the markings and read the timing setting.

If you want to change the ignition timing, then you must turn of the engine and disconnect the Throttle Position Sensor. This will be the only wiring going into the throttle body, so it should be easy to spot, if not easy to access.
Once it is disconnected, start the engine and make sure it is still up to temperature. You must rev the motor three times to above approximately 3000 rpm, which settles the computer for the change. Now with one hand on the loosened distributor, and the other working the timing light, turn the distributor slowly to see the timing change before your eyes. Once the desired setting is selected, turn off the engine, tighten the bolts and connect the TPS and then double check the timing again to make sure it hasn’t moved. Repeat as needed to obtain the best setting. Done!

I personally advanced my ignition timing to 20 degrees BTDC, which has ran perfectly for months now. Please note that 98 octane unleaded petrol is now always needed for safety. I never struggle the car up hills in high gears either, some similar sympathy may be required. Seat of the pants impression is slightly increased ability to rev, and a tad more throttle response. Considering the timing light is the only cost and be used on any car, and that the timing can be changed an infinite number of times, I feel the modification was worth while.
After speaking with a friend I decided to further advance the ignition timing to 25 degrees BTDC. This sounds silly, but has been like this for a few thousand kilometres now without trouble, with varying weather as well. Seat of the pants impression is that the car has that little bit more pace up top, jut enough to warrant the settings to be permanent.
The Process (SR20DET)
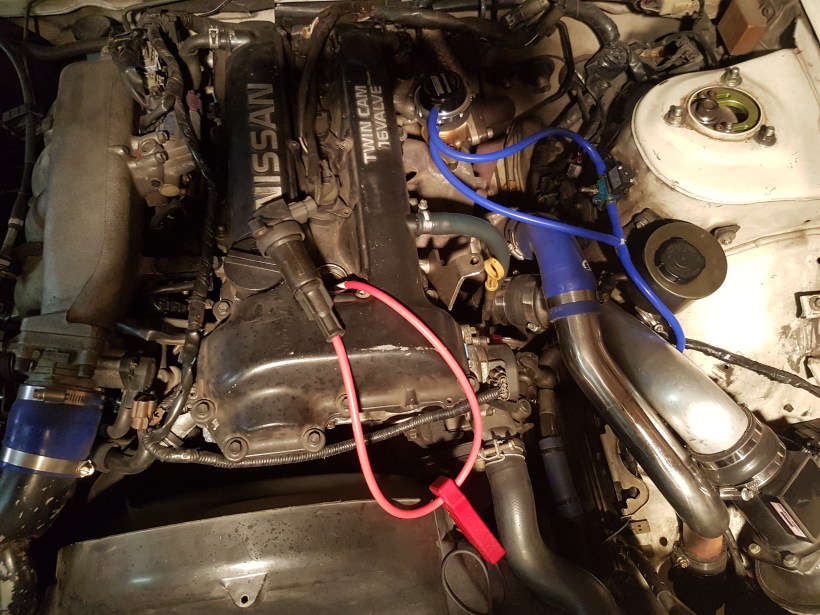
Turbo SR20 engines are different in that they have a coil on plug arrangement instead of a distributor cap. Timing is adjusted by rotating the crank angle sensor instead. This is located in the same place as the distributor cap on non turbo engines: on the front right of the cam cover, directly above the coolant line. Two 12 mm bolts are used to hold the swivelling piece in place.
There is a loop at the rear of the cam cover for attaching the timing light pickup, although the internet seems to think this is unreliable, despite the FSM telling us to use it.
Forums state to buy a spark plug lead for $5, remove the rubber from one end and then insert it between the spark plug and coil pack. This works like an extension cord for household electricity. The timing light pickup can then have take a reading without other influences present. I personally found the readings the same.
Like the SR20DE engine, the TPS needs to be disconnected and the engine revved about 3000 rpm three times to lock the timing. I had Nistune open, watching the timing readout (left hand column, three down). Before this process, the timing was fluctuating from 22 to 26 degrees BTDC. After, it was locked at 22.
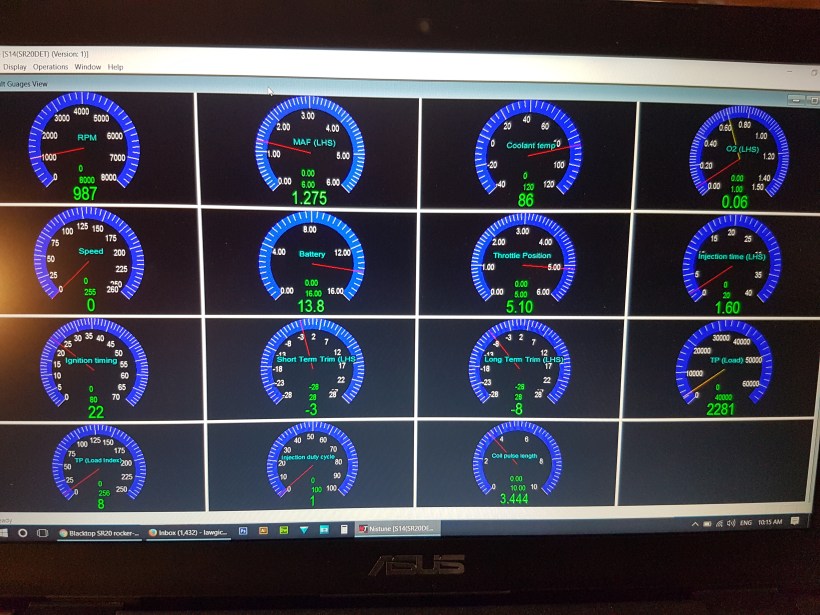
It should be noted that it inaccurate to set the timing to 15 degrees BTDC. As can be seen, the ECU is wanting 22 degrees so blindly setting it to 15 would have the base timing retarded by 7 degrees. Not very good for power production.
Before the car was properly warmed up, the reading was around 40 degrees BTDC. Although the water temp gauge had lifted, the reading was way more advanced than I expected and I was even entertaining the possibility of the timing chain being out 1 tooth. After a decent drive and Nistune reporting the coolant temperature at 86 degrees C, the reading was more reliable.
Another issue was that advancing the timing raised the idle, which sometimes would put it high enough to trigger the VTC, and throw the whole thing forward quite a bit. A rev of the engine settled the rpm back down for the final reading to take place. Restarting the car with everything plugged in again had the idle back to 850 rpm where it should be.
My car was set to about 17 degrees when it should have been 22. I rectified this and was very pleased to find that it gained a fair bit more power. The recent dyno run informed me that it would gain 7 rwkw from only 2 degrees of timing. With the new large muffler in place I felt confident to advance it the full 5 degrees of correction, although another dyno run will be needed soon to ensure all is well.
